Significant contributors to this article include Sneha Aradhey, Software Engineer, Google Kubernetes Engine, and Michael MacDonald, Sr Software Engineer, Google Cloud Managed Lustre.
Enterprise production environments are shifting to distributed, multi-node architectures to serve long-context window lengths and agentic AI. As these workloads scale, KVCaches often outgrow local CPU RAM and host SSD cache tiers.
To handle this, some setups attempt to pool node-local storage into a distributed layer (such as multi-node pooled NVMe arrays). Pooling SSDs aggregates raw capacity and often leverages spare local drives, presenting clear advantages. However, there are some limitations: the approach requires the compute cluster to manage its own complex data distribution and cross-node replication.
An alternative is to offload the attention state to a dedicated, high-performance external parallel filesystem. We utilize Google Cloud Managed Lustre with the llm-d offloading stack as a cluster-wide decentralized attention cache tier, bypassing host-level capacity limits and eliminating the networking overhead of managing local pooled drives.
With this approach, we achieve efficiency at scale:
Google Cloud Managed Lustre enables over 50% TCO savings and reduces GPU-hour requirements for Llama-3.3-70B inference on a six-node A3 Mega cluster by nearly 60%. These gains are realized by offloading shared, prefilled KV caches to Lustre’s high-performance tier with a 95% cache hit rate.
Benchmark Configuration
- Model: Llama-3.3-70B
- Context Dynamics: Prompt length of 50,000 tokens, input question length of 256 tokens, and output length of 512 tokens.
Extension of Lustre KV Cache solution with CPU RAM offload
The Managed Lustre KV Cache offload architecture can be extended via integration of offload to CPU RAM. This hybrid approach significantly improves performance compared to CPU offload only, delivering approximately 40% improvement in Time to First Token (TTFT) and a 30% reduction in end-to-end latency, for Llama-3.3-70B inference.
User Guide
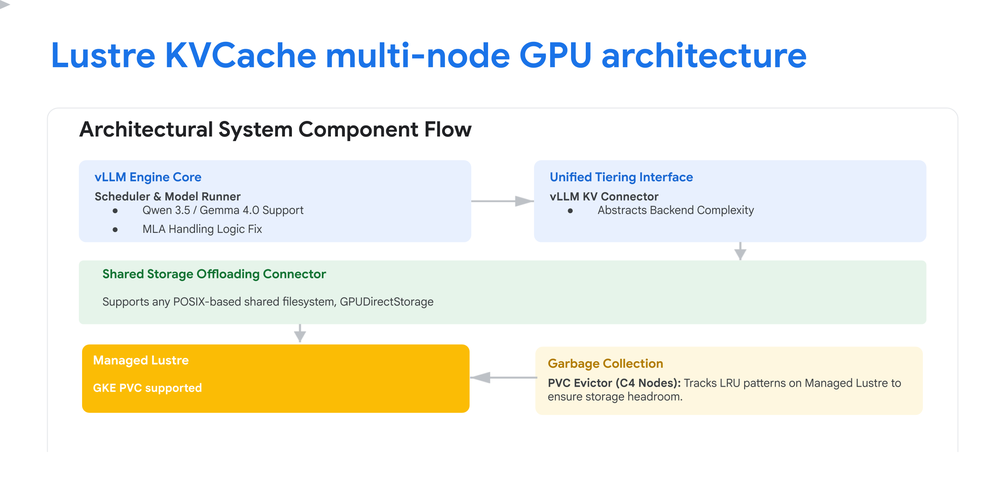
Architectural Components
- GKE GPU Nodes: Dedicated accelerator resources provisioned exclusively for high-throughput model execution and tensor-parallel operations.
- Managed Lustre: A shared, high-bandwidth parallel filesystem acting as a centralized external tier that caches prefilled attention states to eliminate redundant prefill computation.
- PVC Evictor: A scalable, distributed garbage collection service that tracks file access patterns and automatically removes Least-Recently-Used (LRU) cache chunks to maintain healthy storage headroom.
Target Models
This guide provides two distinct, validated tracks for deployment depending on your model preference:
- Qwen Series:
Qwen/Qwen3.5-35B-A3B - Gemma 4 Architecture:
google/gemma-4-31B-it
Architectural Diagram
Before You Begin
Before starting this deployment, ensure your Google Cloud project is properly configured:
- Quota: Verify you have sufficient quota for the selected accelerators in your chosen region, as well as adequate general CPU, memory, and Managed Lustre quotas.
- Validate Required IAM Permissions for Managed Lustre
- Prepare your Environment to Connect to Managed Lustre: Complete the “Before You Begin” steps to enable APIs, set up environment variables, and set up your VPC.
- GKE Version: The Managed Lustre CSI driver is supported on GKE versions 1.33 or later. For the best experience and default port (988) usage, GKE version 1.33.2-gke.4780000 or later is recommended.
Overview of Required Steps
- Create the GKE Cluster
- Create the GPU Compute node pool
- Provision Lustre storage
- Deploy vLLM Serving Engine with Lustre
- Deploy the PVC Evictor
- Clean Up
1. Create the GKE Cluster
Create a rapid-channel GKE cluster with Workload Identity and all necessary CSI storage add-ons enabled (Lustre, GCSFuse and Persistent Disk).
- code_block
- <ListValue: [StructValue([(‘code’, ‘export CLUSTER_NAME=”<INSERT CLUSTER NAME>”rnexport ZONE=”<INSERT ZONE>”rnexport PROJECT_ID=”<INSERT PROJECT>”rnexport NETWORK_NAME=”<INSERT NETWORK>”rnrngcloud container clusters create “$CLUSTER_NAME” \rn –zone “$ZONE” \rn –num-nodes “1” \rn –network “${NETWORK_NAME}” \rn –addons “HorizontalPodAutoscaling,HttpLoadBalancing,GcePersistentDiskCsiDriver,GcsFuseCsiDriver,LustreCsiDriver” \rn –workload-pool “${PROJECT_ID}.svc.id.goog” \rn –enable-managed-prometheus \rn –enable-ip-alias \rn –enable-shielded-nodes \rn –shielded-integrity-monitoring \rn –no-shielded-secure-boot \rn –node-locations “$ZONE” \rn –network=”${NETWORK_NAME}” \rn –gateway-api=standard’), (‘language’, ”), (‘caption’, <wagtail.rich_text.RichText object at 0x7f6c5eab0e50>)])]>
2. Create the GPU Compute Node Pool
Provision an GPU VM node pool ( e.g. a3-megagpu-4g, a4-highgpu-4g, etc.).
- code_block
- <ListValue: [StructValue([(‘code’, ‘gcloud beta container node-pools create gpu-vm nodepool \rn –location=”$ZONE” \rn –cluster=”$CLUSTER_NAME” \rn –project=”$PROJECT_ID” \rn –accelerator=”type=<INSERT GPU_ACCELERATOR_NAME>,count=<INSERT GPU_COUNT>,gpu-driver-version=LATEST” \rn –machine-type=”<INSERT GPU_COMPUTE_VM_MACHINE TYPE>” \rn –num-nodes=”<INSERT NODE_COUNT>” \rn –enable-gvnic \rn –no-enable-autoupgradernrn# Fetch cluster credentialsrngcloud container clusters get-credentials “$CLUSTER_NAME” –zone “$ZONE”‘), (‘language’, ”), (‘caption’, <wagtail.rich_text.RichText object at 0x7f6c5eab0e20>)])]>
3. Provision Lustre Storage (Auto-provisioned)
Before deploying vLLM, you need to provision the Lustre storage. We use an auto-provisioned Lustre instance via a StorageClass and a PersistentVolumeClaim (PVC).
Create a file named lustre-pvc.yaml with the following content:
- code_block
- <ListValue: [StructValue([(‘code’, ‘apiVersion: storage.k8s.io/v1rnkind: StorageClassrnmetadata:rn name: lustre-classrnprovisioner: lustre.csi.storage.gke.iornvolumeBindingMode: ImmediaternreclaimPolicy: DeleternmountOptions:rn – localflockrnparameters:rn perUnitStorageThroughput: “<CHOOSE_PERFORMANCE_TIER>” # See options below.rn network: “<INSERT NETWORK_NAME>”rn—rnapiVersion: v1rnkind: PersistentVolumeClaimrnmetadata:rn name: lustre-pvcrnspec:rn accessModes:rn – ReadWriteManyrn resources:rn requests:rn storage: <INSERT CAPACITY_GiB> # Range from 9000Gi to 84016000Gi, increments and ranges are Lustre tier-dependent.rn storageClassName: lustre-class’), (‘language’, ”), (‘caption’, <wagtail.rich_text.RichText object at 0x7f6c5eab0b50>)])]>
Notes: Performance tier options are “125”, “250”, “500”, and “1000”. Per-tier capacity ranges and increments can be found here.
Apply this manifest to provision the Lustre instance and observe provisioning:
- code_block
- <ListValue: [StructValue([(‘code’, ‘# 1. Submit the file to the cluster (finishes instantly)rnkubectl apply -f lustre-pvc.yamlrnrn# 2. Watch the live provisioning stream until it says “Bound”rnkubectl get pvc lustre-pvc -w’), (‘language’, ”), (‘caption’, <wagtail.rich_text.RichText object at 0x7f6c5eab0ee0>)])]>
4. Deploy vLLM Serving Engine with Lustre
Step 4a: Create the Hugging Face Access Secret
Before submitting the deployment manifest, you must provision your Hugging Face API token as a secure secret within the cluster.
Run the following command, replacing `<INSERT_HF_TOKEN>` with your token:
- code_block
- <ListValue: [StructValue([(‘code’, ‘kubectl create secret generic hf-token-secret \rn –from-literal=token=”<INSERT_HF_TOKEN>” \rn –namespace=default’), (‘language’, ”), (‘caption’, <wagtail.rich_text.RichText object at 0x7f6c5eab0c70>)])]>
Step 4b: Create the vLLM Deployment Manifest
This complete Kubernetes manifest deploys the vLLM engine, configures the llmd-fs-connector for high-performance KV-caching, and mounts your parallel Lustre storage (lustre-pvc).
Common Manifest (Choose between Qwen3.5 or gemma-4)
Replace example values between <> with appropriate values for your environment.
- code_block
- <ListValue: [StructValue([(‘code’, ‘apiVersion: apps/v1rnkind: Deploymentrnmetadata:rn name: vllm-storagern namespace: defaultrn labels:rn app: vllm-storagernspec:rn replicas: 1rn selector:rn matchLabels:rn app: vllm-storagern template:rn metadata:rn labels:rn app: vllm-storagern spec:rn nodeSelector:rn cloud.google.com/gke-accelerator: nvidia-h100-80gbrn tolerations:rn – key: “nvidia.com/gpu”rn operator: “Exists”rn effect: “NoSchedule”rn securityContext:rn fsGroup: <YOUR_NON_ROOT_GID>rn runAsUser: <YOUR_NON_ROOT_UID>rn volumes:rn – name: lustre-storagern persistentVolumeClaim:rn claimName: lustre-pvcrn – name: shmrn emptyDir:rn medium: Memoryrn sizeLimit: “200Gi”rn containers:rn – name: vllm-storagern image: vllm/vllm-openai:v0.23.0-cu129rn volumeMounts:rn – mountPath: /mnt/files-storagern name: lustre-storagern command:rn – “/bin/bash”rn args:rn – “-c”rn – |rn set -xrn export USER=vllmrn export LOGNAME=vllmrn pip install –user msgpackrn pip install ‘llmd-fs-connector==0.23’ –extra-index-url https://llm-d.github.io/llm-d-kv-cache/simple/rn rn vllm serve <MODEL_NAME> \ # google/gemma-4-31B-it OR Qwen/Qwen3.5-35B-A3Brn –download-dir /model/models \rn –load-format auto \rn –kv-transfer-config ‘{rn “kv_connector”: “MultiConnector”,rn “kv_role”: “kv_both”,rn “kv_connector_extra_config”: {rn “connectors”: [rn {rn “kv_connector”: “OffloadingConnector”,rn “kv_role”: “kv_both”,rn “kv_connector_extra_config”: {rn “cpu_bytes_to_use”: 64424509440,rn “lazy_offload”: truern }rn },rn {rn “kv_connector”: “OffloadingConnector”,rn “kv_role”: “kv_both”,rn “kv_connector_extra_config”: {rn “spec_name”: “SharedStorageOffloadingSpec”,rn “spec_module_path”: “llmd_fs_backend.spec”,rn “shared_storage_path”: “/mnt/files-storage/llmd-kv-cache/”,rn “threads_per_gpu”: 32,rn “block_size”: <BLOCK_SIZE> # 256 for gemma or 528 for Qwen3.5rn }rn }rn ]rn }rn }’ \rn –distributed_executor_backend “mp” \rn –port 8000 \rn –max_num_batched_tokens 16384 \rn –enable-chunked-prefill \rn –max-model-len 32000 \rn –gpu-memory-utilization 0.92 \rn –tensor-parallel-size “4” \rn –prefix-caching-hash-algo sha256_cbor \rn –enable_prefix_caching \rn –enforce-eager \rn –no-disable-hybrid-kv-cache-managerrn env:rn – name: HUGGING_FACE_HUB_TOKENrn valueFrom:rn secretKeyRef:rn name: hf-token-secretrn key: tokenrn # … probes …rn resources:rn requests:rn nvidia.com/gpu: “4”rn limits:rn nvidia.com/gpu: “4”‘), (‘language’, ”), (‘caption’, <wagtail.rich_text.RichText object at 0x7f6c5eab0be0>)])]>
Note: Qwen-3.5 specifically requires a block size of 528 to avoid fragmentation, while Gemma 4 functions perfectly with the default 256.
Step 4c: Apply and Verify Deployment
To apply this manifest to your cluster, run:
- code_block
- <ListValue: [StructValue([(‘code’, ‘kubectl apply -n default -f vllm-lustre-deployment.yaml’), (‘language’, ”), (‘caption’, <wagtail.rich_text.RichText object at 0x7f6c5eab0dc0>)])]>
Step 4d: Track Model Download Status
Because large models can take some time to download on first boot, track the initialization logs directly by streaming the container logs:
Bash
- code_block
- <ListValue: [StructValue([(‘code’, ‘kubectl rollout status deployment/vllm-storage’), (‘language’, ”), (‘caption’, <wagtail.rich_text.RichText object at 0x7f6c5eab0730>)])]>
5. Deploy the PVC Evictor
PVC Evictor Overview
Architecture & Role
The llmd_fs_backend connector offloads KV-cache blocks to Lustre but does not natively delete old cache files. Over time, the cache will fill the shared filesystem. The PVC Evictor acts as an external garbage collector that continuously monitors disk usage and evicts least-recently-used (LRU) files to maintain healthy storage headroom.
Scaling & Sharding
The PVC Evictor supports sharding and can be scaled to multiple replicas to match the capacity and performance of your Lustre instance. As a rule of thumb, you should deploy 1 evictor replica for each 72 TB of Lustre capacity to distribute the eviction load effectively without overwhelming the metadata servers.
For large-scale deployments, the evictor can be configured to run with multiple shards. When running in multi-replica mode, the workload is partitioned across pods, with each pod managing a specific shard of the cache namespace. This prevents redundant metadata scans and race conditions.
High-Performance Resource Requirements
Running the evictor at high scale (e.g., with 16 parallel crawler processes) requires significant CPU and memory resources to handle the rapid scanning and queue management of millions of files. Ensure that the pods are provisioned with sufficient resources (e.g., 12 CPU requests and 8Gi Memory requests) and scheduled on appropriate node types (such as c4-standard-16).
PVC Evictor Deployment Steps
The PVC Evictor is deployed via Helm using the chart located in kv_connectors/pvc_evictor/helm.
Step 5a: Create a Dedicated Node Pool for the Evictor
Running the evictor at high scale requires significant CPU and memory. First, create a dedicated node pool using a high-performance machine type (such as c4-standard-16) to accommodate the 12 CPU and 8Gi memory requests needed per pod.
- code_block
- <ListValue: [StructValue([(‘code’, ‘# Create a dedicated node pool for the PVC Evictorrngcloud container node-pools create evictor-pool \rn –location=”$ZONE” \rn –cluster=”$CLUSTER_NAME” \rn –project=”$PROJECT_ID” \rn –machine-type=”c4-standard-16″ \rn –num-nodes=”1″‘), (‘language’, ”), (‘caption’, <wagtail.rich_text.RichText object at 0x7f6c5ec73cd0>)])]>
Step 5b: Install via Helm (High-Performance Configuration)
Deploy a scaled, high-performance evictor pool with 2 replicas to monitor lustre-pvc. This configuration uses 16 crawler processes per pod to handle massive file namespaces.
Note on Security Contexts: To allow the evictor pod to delete files created by vLLM, it must run with matching security context IDs. Ensure the placeholders <YOUR_NON_ROOT_GID> and <YOUR_NON_ROOT_UID> exactly match the non-root values used in the securityContext of your vLLM deployment to ensure shared POSIX file permissions.
- code_block
- <ListValue: [StructValue([(‘code’, ‘git clone –depth 1 https://github.com/llm-d/llm-d-kv-cache.gitrncd llm-d-kv-cache/kv_connectors/pvc_evictorrnrnhelm install pvc-evictor ./helm \rn –namespace default \rn –set replicaCount=1 \rn –set config.numCrawlerProcesses=16 \rn –set config.deletionBatchSize=5000 \rn –set config.fileQueueMinSize=1000000 \rn –set config.fileQueueMaxsize=2000000 \rn –set config.fileAccessTimeThresholdMinutes=10 \rn –set securityContext.container.runAsNonRoot=false \rn –set pvc.name=”lustre-pvc” \rn –set config.cleanupThreshold=85.0 \rn –set config.targetThreshold=70.0 \rn –set config.cacheDirectory=”llmd-kv-cache” \rn –set securityContext.pod.fsGroup=<YOUR_NON_ROOT_GID> \rn –set securityContext.container.runAsUser=<YOUR_NON_ROOT_UID> \rn –set resources.requests.cpu=12 \rn –set resources.requests.memory=8Gi \rn –set resources.limits.cpu=15 \rn –set resources.limits.memory=16Gi \rn –set nodeSelector.”cloud\.google\.com/gke-nodepool”=evictor-pool \rn –set securityContext.pod.seLinuxOptions.level=”s0:c0\,c1″‘), (‘language’, ”), (‘caption’, <wagtail.rich_text.RichText object at 0x7f6c5ec73370>)])]>
Critical Parameters Explained:
replicaCount=2: Deploys 2 evictor pods. The Helm chart automatically configures sharding (totalShards=2) when multiple replicas are used.config.numCrawlerProcesses=16: Runs 16 parallel crawler threads per pod to scan the filesystem rapidly.config.deletionBatchSize=5000: Deletes files in batches of 5000 to reduce metadata overhead.config.fileQueueMinSize&config.fileQueueMaxsize: Configures large memory queues (1M min, 2M max) to buffer files for deletion, matching the high crawler throughput.config.fileAccessTimeThresholdMinutes=10: Aggressively evicts files that haven’t been accessed in the last 10 minutes when the cleanup threshold is triggered.securityContext.container.runAsNonRoot=false: Required if the evictor needs root-like permissions to manage/delete files across different user ownerships on the shared storage.resources.requests&limits: Allocates 12-15 CPUs and 8-16Gi of memory per pod to ensure the high number of crawler processes do not get CPU-throttled or run Out-Of-Memory (OOM).
Step 5c: Verify and Monitor
- code_block
- <ListValue: [StructValue([(‘code’, ‘# Verify pod statusrnkubectl get pods -l app.kubernetes.io/name=pvc-evictor -n default’), (‘language’, ”), (‘caption’, <wagtail.rich_text.RichText object at 0x7f6c5ec73610>)])]>
Step 6: Clean Up
Because this deployment provisions significant and high-cost hardware, be sure to clean up your environment when you are done to avoid unnecessary charges.
Bash
- code_block
- <ListValue: [StructValue([(‘code’, ‘helm uninstall pvc-evictor && kubectl delete -f vllm-lustre-deployment.yamlrnrnkubectl delete pvc lustre-pvcrnrn# Delete the cluster (this also deletes the associated node pools)rngcloud container clusters delete “$CLUSTER_NAME” \rn –zone “$ZONE” \rn –project “$PROJECT_ID” \rn –quietrnrn# Note: The Lustre StorageClass reclaimPolicy is set to Delete, rn# so destroying the PVC or Cluster will automatically clean up the underlying Lustre storage.’), (‘language’, ”), (‘caption’, <wagtail.rich_text.RichText object at 0x7f6c5ec73df0>)])]>
Appendix: Reference Configuration for Llama-3.3-70B Benchmark
The following configuration is a representation of the deployment manifest used to generate the Llama-3.3-70B benchmark results referenced in this post. It is provided for completeness and transparency.
Note: This configuration utilizes an earlier iteration of the software stack (vLLM v0.15.0) and specific infrastructure flags that were active in the benchmarking environment at the time the data was collected.
- code_block
- <ListValue: [StructValue([(‘code’, ‘apiVersion: apps/v1rnkind: Deploymentrnmetadata:rn name: vllm-storagern namespace: defaultrn labels:rn app: vllm-storagernspec:rn replicas: 1rn selector:rn matchLabels:rn app: vllm-storagern template:rn metadata:rn labels:rn app: vllm-storagern spec:rn volumes:rn – name: lustre-storagern persistentVolumeClaim:rn claimName: lustre-pvcrn – name: shmrn emptyDir:rn medium: Memoryrn sizeLimit: “200Gi”rn – name: kv-store-diskrn persistentVolumeClaim:rn claimName: lustre-pvcrn containers:rn – name: vllm-storagern image: vllm/vllm-openai:v0.15.0rn command:rn – “/bin/bash”rn args:rn – “-c”rn – |rn pip install https://raw.githubusercontent.com/kfirtoledo/llm-d-kv-cache-manager/connector/kv_connectors/llmd_fs_backend/wheels/llmd_fs_connector-0.1.0-cp312-cp312-linux_x86_64.whl; \rn mkdir -p /tmp/prometheus_metrics;rn export PROMETHEUS_MULTIPROC_DIR=/tmp/prometheus_metrics; \rn vllm serve meta-llama/Llama-3.3-70B-Instruct \rn –download-dir /model/models \rn –load-format runai_streamer \rn –kv-transfer-config ‘{ rn “kv_connector”: “OffloadingConnector”, rn “kv_role”: “kv_both”,rn “kv_connector_extra_config”: {rn “spec_name”: “SharedStorageOffloadingSpec”,rn “spec_module_path”: “llmd_fs_backend.spec”,rn “shared_storage_path”: “/mnt/files-storage/llmd-kv-cache/”,rn “block_size”: 1024,rn “threads_per_gpu”: “64”rn }rn }’ \rn –distributed_executor_backend “mp” \rn –port 8000 \rn –max_num_batched_tokens 16384 \rn –enable-chunked-prefill \rn –tensor-parallel-size 8 \rn –enable_prefix_caching \rn –gpu-memory-utilization 0.9rn env:rn – name: HUGGING_FACE_HUB_TOKENrn valueFrom:rn secretKeyRef:rn name: hf-token-secretrn key: tokenrn – name: VLLM_EXECUTE_MODEL_TIMEOUT_SECONDSrn value: “3000”rn – name: PYTHONHASHSEEDrn value: “123”rn ports:rn – containerPort: 8000rn resources:rn limits:rn nvidia.com/gpu: “8”rn requests:rn cpu: “200”rn memory: 1024Grn ephemeral-storage: 5120Girn nvidia.com/gpu: “8”rn volumeMounts:rn – name: lustre-storagern mountPath: /modelrn – mountPath: /root/.cache/huggingfacern name: lustre-storagern subPath: huggingface-cachern – name: shmrn mountPath: /dev/shmrn – mountPath: /mnt/files-storagern name: kv-store-diskrn # … probes omitted for brevity …’), (‘language’, ”), (‘caption’, <wagtail.rich_text.RichText object at 0x7f6c5ec738e0>)])]>