My team’s mission is to accelerate the developer journey from writing code to running secure AI workloads on Google Cloud. To help developers succeed, we focus on identifying their most pressing questions and building demos that provide straightforward, easy-to-implement solutions.
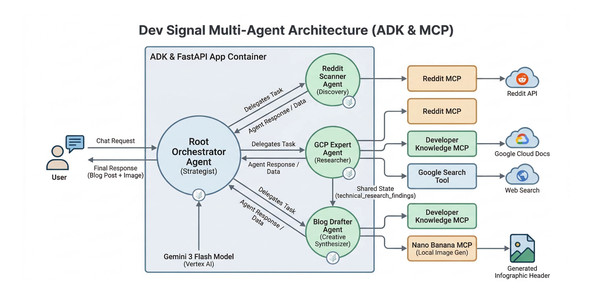
Recently, I was struck with inspiration when the new Developer Knowledge MCP server was released. It led me to build Dev Signal—a multi-agent system designed with Google Agent Development Kit (ADK)—to identify technical questions from Reddit, research them using official documentation, and draft detailed technical blogs. Dev Signal also provides custom visuals using Nano Banana Pro. I even integrated a long-term memory layer so the agent remembers my specific preferences and blogging style.
By connecting my coding assistant, Gemini CLI, to the developer knowledge MCP server, I built and deployed this entire system to Google Cloud Run in just two days.
Whether you want to learn how to architect a complex multi-agent system with long term memory, leverage local and remote MCP servers for tool standardization, or write detailed Terraform scripts for secure Cloud Run deployment, I’ll show you how!
If you’d rather dive straight into the code and explore it at your own pace, you can clone the repository here.
What you’ll learn
In this four-part blog series, I’ll walk you through the step-by-step process of how I brought this project to life. Each blog post captures the journey of building and deploying Dev Signal:
-
Part 1: Tools for building agent capabilities – You’ll begin by setting up your project environment and equipping your agent with tools using the Model Context Protocol (MCP). You’ll learn how to connect to Reddit for trend discovery, Google Cloud docs for technical grounding, and a custom Nano Banana Pro tool for image generation.
-
Part 2: The Multi-Agent Architecture with long term memory – You’ll build the “brain” of the system by implementing a root orchestrator and a team of specialized agents. You’ll also integrate the Vertex AI memory bank, enabling the agent to learn and persist your preferences across sessions.
-
Part 3: Testing the agent Locally – Before moving to the cloud, you’ll synchronize the agent’s components and verify its performance on your workstation. You’ll use a dedicated test runner to simulate the full lifecycle of discovery, research, and multimodal creation, with a special focus on validating long-term memory persistence by connecting your local agent directly to the cloud-based Vertex AI memory bank.
-
Part 4: Deployment to Cloud Run and the Path to Production – Finally, you’ll deploy your service on Google Cloud Run using Terraform for reproducible infrastructure. You’ll also discuss the next steps required for a high quality secure production system.
Getting started with Dev Signal
Dev Signal is an intelligent monitoring agent designed to filter noise and create value. Dev Signal operates in the following ways:
-
Discovery: Scouts Reddit for high-engagement technical questions.
-
Grounding: Researches answers using official Google Cloud documentation to ensure accuracy.
-
Creation: Drafts professional technical blog posts based on its findings.
-
Multimodal Generation: Generates custom infographic headers for those posts.
-
Long-Term Memory: Uses Vertex AI memory bank to remember your feedback across different sessions.
Prerequisites
Before you begin, verify the following is installed:
-
Python 3.12+
-
uv (Python package manager):
curl -LsSf https://astral.sh/uv/install.sh | sh -
Google Cloud SDK (
gcloudCLI) installed and authenticated. -
Terraform (for infrastructure as code).
-
Node.js & npm (required for the Reddit MCP tool).
You will also need:
-
A Google Cloud Project with billing enabled.
-
APIs Enabled: Vertex AI, Cloud Run, Secret Manager, Artifact Registry.
-
Reddit API Credentials (Client ID, Secret) – You can get these from the Reddit Developer Portal.
-
Developer Knowledge API Key (for Google Cloud docs search) – Instructions on how to get it are here.
Project Setup
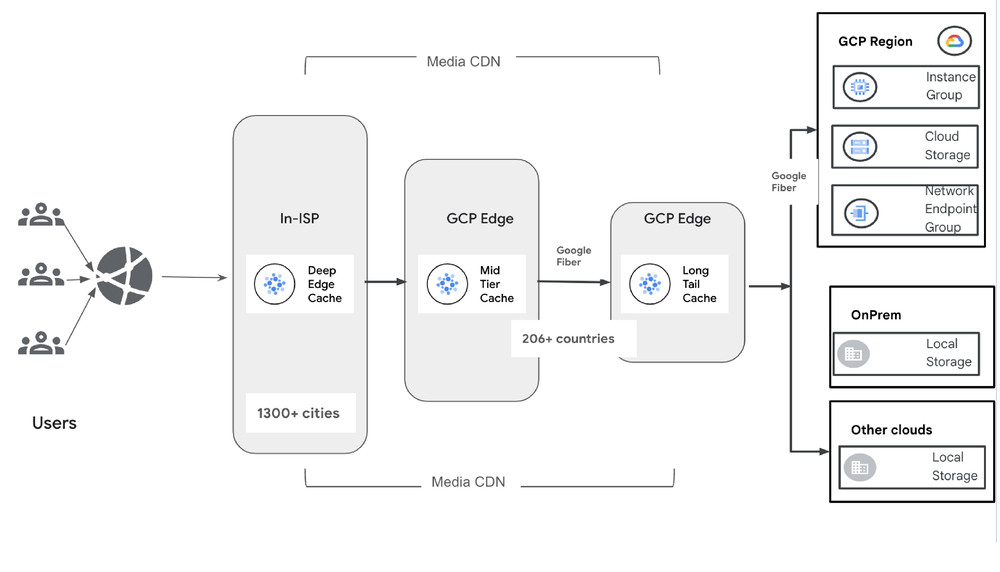
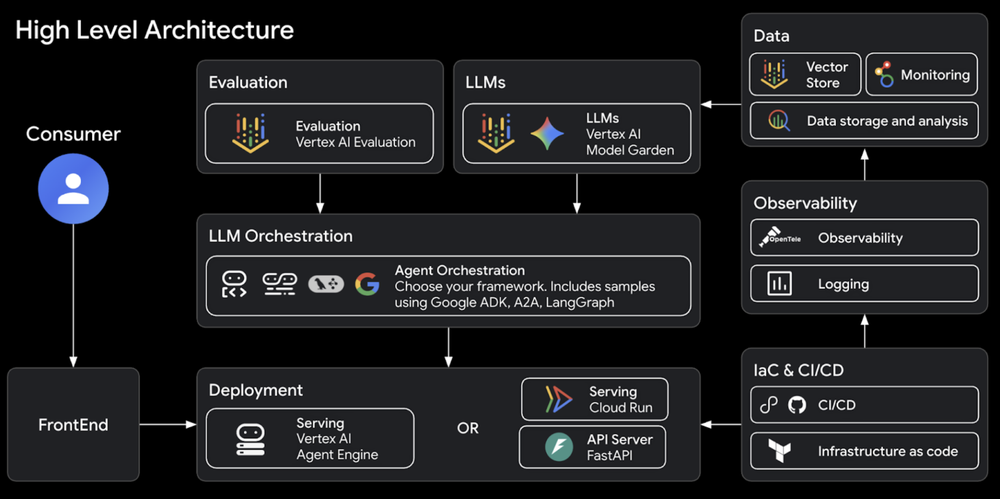
The Dev Signal system was built by first running the Agent Starter Pack, following the automated architect workflow described in the Agent Factory episode by Remigiusz Samborski and Vlad Kolesnikov. This foundation provided the project’s modular directory structure, which is used to separate concerns between Agent Logic, Server Code, Utilities, and Tools.
The starter pack acts as a powerful starting point because it automates the creation of professional infrastructure, CI/CD pipelines, and observability tools in seconds. This allows you to focus entirely on the agent’s unique intelligence while ensuring the underlying platform remains secure and scalable. By building on top of this generated boilerplate with AI assistance from Gemini CLI and Antigravity, the development process is highly accelerated.
The agent starter pack high level architecture:
1. Initialize the Project
Create a new directory for your project and initialize it. We’ll use uv, which is an extremely fast Python package manager.
- code_block
- <ListValue: [StructValue([(‘code’, ‘uv init dev-signal’), (‘language’, ”), (‘caption’, <wagtail.rich_text.RichText object at 0x7fbef03f1760>)])]>
2. Folder Structure
Our project will follow this structure. We will populate these files step-by-step.
- code_block
- <ListValue: [StructValue([(‘code’, ‘dev-signal/rn├── dev_signal_agent/rn│ ├── __init__.pyrn│ ├── agent.py # Agent logic & orchestrationrn│ ├── fast_api_app.py # Application server & memory connectionrn│ ├── app_utils/ # Env Configrn│ │ └── env.pyrn│ └── tools/ # External capabilitiesrn│ ├── __init__.pyrn│ ├── mcp_config.py # Tool configuration (Reddit, Docs)rn│ └── nano_banana_mcp/# Custom local image generation toolrn│ ├── __init__.pyrn│ ├── main.pyrn│ ├── nano_banana_pro.pyrn│ ├── media_models.pyrn│ ├── storage_utils.pyrn│ └── requirements.txtrn├── deployment/rn│ └── terraform/ # Infrastructure as Codern├── .env # Local secrets (API keys)rn├── Makefile # Shortcuts for building/deployingrn├── Dockerfile # Container definitionrn└── pyproject.toml # Dependencies’), (‘language’, ”), (‘caption’, <wagtail.rich_text.RichText object at 0x7fbef03f10d0>)])]>
3. Define Dependencies
Update your pyproject.toml with the necessary dependencies. We use google-adk for the agent framework and google-genai for the model interaction.
- code_block
- <ListValue: [StructValue([(‘code’, ‘[project]rnname = “dev-signal”rnversion = “0.1.0”rndescription = “A multi-agent system for monitoring and content creation.”rnreadme = “README.md”rnrequires-python = “>=3.12, <3.14″rndependencies = [rn “google-adk>=0.1.0″,rn xa0″google-genai>=1.0.0”,rn “mcp>=1.0.0″,rn xa0″python-dotenv>=1.0.0”,rn “fastapi>=0.110.0”,rn “uvicorn>=0.29.0”,rn “google-cloud-logging>=3.0.0”,rn “google-cloud-aiplatform>=1.38.0″,rn xa0″fastmcp>=2.13.0”,rn “google-cloud-storage>=3.6.0”,rn “google-auth>=2.0.0”,rn “google-cloud-secret-manager>=2.26.0″,rn]’), (‘language’, ”), (‘caption’, <wagtail.rich_text.RichText object at 0x7fbef03f1310>)])]>
Run uv sync to install everything.
Create a new directory for the agent code.
- code_block
- <ListValue: [StructValue([(‘code’, ‘mkdir dev_signal_agentrncd dev_signal_agent’), (‘language’, ”), (‘caption’, <wagtail.rich_text.RichText object at 0x7fbef03f1610>)])]>
Building the agent capabilities: MCP tools
Our agent needs to interact with the outside world. We use the Model Context Protocol (MCP) to standardize this. The Model Context Protocol (MCP) is a universal standard for connecting AI agents to external data and tools. Instead of writing custom API wrappers, we use standard MCP servers. This allows us to connect to APIs (Reddit), Knowledge Bases (Google Cloud Docs), and even local scripts (Image Generation using Nano Banana Pro) using a common interface. Create a new directory for the agent tools.
- code_block
- <ListValue: [StructValue([(‘code’, ‘mkdir toolsrncd tools’), (‘language’, ”), (‘caption’, <wagtail.rich_text.RichText object at 0x7fbef03f1dc0>)])]>
Tools Configuration
We’ll define our toolsets in dev_signal_agent/tools/mcp_config.py.
This file defines the connection parameters for our three main tools.
-
Reddit: Connected via a local stdio subprocess.
-
Developer Knowledge: Connected via a remote HTTP endpoint.
-
Nano Banana: Connected via a local stdio subprocess (our custom Python script).
Reddit Search (Discovery Tool)
The Reddit MCP server acts as a bridge to the Reddit API, allowing your agent to discover trending posts and analyze engagement without you having to write complex API wrappers. To ensure portability, the code uses a “find or fetch” strategy: it first checks for a local installation and, if missing, automatically uses npx to download and run the server on demand.
Instead of a network connection, the agent launches the server as a local subprocess and communicates via standard input and output (stdio). Within the Google ADK, the McpToolset class acts as a universal wrapper that standardizes these connections, enabling your agent to interact with various tools, from community resources to custom scripts like the Nano Banana image generator, using a common interface. By securely passing API credentials through environment variables, the system ensures these “plug-and-play” modules function as a seamless bridge between the AI and external platforms.
Paste this code in dev_signal_agent/tools/mcp_config.py:
- code_block
- <ListValue: [StructValue([(‘code’, ‘import osrnimport shutilrnfrom mcp import StdioServerParametersrnfrom google.adk.tools import McpToolsetrnfrom google.adk.tools.mcp_tool import StreamableHTTPConnectionParams, StdioConnectionParamsrnrndef get_reddit_mcp_toolset(client_id: str = “”, client_secret: str = “”, user_agent: str = “”):rn “””rn Connects to the Reddit MCP server.rn This server runs as a local subprocess (stdio) and proxies requests to the Reddit API.rn “””rn # Check if ‘reddit-mcp’ is installed globally, otherwise use npx to run itrn cmd = “reddit-mcp” if shutil.which(“reddit-mcp”) else “npx”rn args = [] if shutil.which(“reddit-mcp”) else [“-y”, “–quiet”, “reddit-mcp”]rn rn # Inject secrets into the environment of the subprocess onlyrn env = {rn **os.environ, rn “DOTENV_CONFIG_SILENT”: “true”, rn “LANG”: “en_US.UTF-8″rn }rnrn if client_id: env[“REDDIT_CLIENT_ID”] = client_idrn if client_secret: env[“REDDIT_CLIENT_SECRET”] = client_secretrn if user_agent: env[“REDDIT_USER_AGENT”] = user_agentrnrn return McpToolset(rn connection_params=StdioConnectionParams(rn server_params=StdioServerParameters(rn command=cmd, rn args=args, rn env=env # Pass injected secrets directly to the subprocessrn ),rn timeout=120.0rn )rn )’), (‘language’, ‘lang-py’), (‘caption’, <wagtail.rich_text.RichText object at 0x7fbef03f1340>)])]>
Google Cloud Docs (Knowledge Tool)
The Developer Knowledge MCP server provides grounding for your agent by allowing it to search the entire corpus of official Google Cloud documentation. Unlike the local Reddit server, this is a managed service hosted by Google and accessed as a remote endpoint over the internet. It exposes specialized tools like google_developer_documentation_search for semantic queries and google_developer_documentation_fetch to retrieve full markdown content, ensuring that every technical claim the agent makes is supported by definitive, up-to-date facts.
Note: you can also connect your coding assistant tools such as Gemini CLI or Antigravity to the developer knowledge MCP server to empower them with handy up to date Google Cloud documentation. I used it when writing this blog!
To connect, the agent uses the McpToolset class with StreamableHTTPConnectionParams, pointing to a web URL instead of launching a local process. It securely authenticates using a DK_API_KEY (create your api key) passed in the request headers, allowing the agent to perform a “comprehensive research sweep” across official docs, community sentiment, and broader web context through a single standardized interface.
Paste this code in dev_signal_agent/tools/mcp_config.py:
- code_block
- <ListValue: [StructValue([(‘code’, ‘def get_dk_mcp_toolset(api_key: str = “”):rn “””rn Connects to Developer Knowledge (Google Cloud Docs).rn This is a remote MCP server accessed via HTTP.rn “””rn headers = {}rn if api_key:rn headers[“X-Goog-Api-Key”] = api_keyrn else:rn # Fallback to os.environ for local testing if not passed via APIrn headers[“X-Goog-Api-Key”] = os.getenv(“DK_API_KEY”, “”)rnrn return McpToolset(rn connection_params=StreamableHTTPConnectionParams(rn url=”https://developerknowledge.googleapis.com/mcp”,rn headers=headersrn )rn )’), (‘language’, ‘lang-py’), (‘caption’, <wagtail.rich_text.RichText object at 0x7fbef03f1670>)])]>
The Image Generator (Nano Banana MCP)
While we’ve used external MCP servers for Reddit and documentation, we can also build our own custom MCP server to wrap specific Python logic. In this case, we are creating an image generation tool powered by Gemini 3 Pro Image (also known as Nano Banana Pro). This demonstrates that any Python function can be standardized into a tool that any agent can understand.
How the image generation works:
-
FastMCP: We use the
fastmcplibrary to drastically simplify server creation, allowing us to register Python functions as tools with just a few lines of code. -
Gemini Integration: The server uses the Google GenAI SDK to call the
gemini-3-pro-image-previewmodel, which converts the agent’s descriptive prompts into raw image bytes. -
GCS Upload & Hosting: Because agent interfaces typically require a URL to display images, the server automatically uploads the generated bytes to Google Cloud Storage (GCS) and returns a public link.
To connect this local tool, we use StdioConnectionParams because the server runs as a local subprocess communicating via standard input and output. This transport method directly matches the transport="stdio" configuration we will define in our server entrypoint, ensuring a seamless connection for your custom local scripts.
The following code defines the MCP connection in dev_signal_agent/tools/mcp_config.py. We use uv run to ensure the server starts in an isolated environment with all its dependencies correctly installed.
Paste this code in dev_signal_agent/tools/mcp_config.py:
- code_block
- <ListValue: [StructValue([(‘code’, ‘def get_nano_banana_mcp_toolset():rn “””rn Connects to our local ‘Nano Banana’ image generator.rn This demonstrates how to wrap a local Python script as an MCP tool.rn “””rn path = os.path.join(“dev_signal_agent”, “tools”, “nano_banana_mcp”, “main.py”)rn bucket = os.getenv(“AI_ASSETS_BUCKET”) rn return McpToolset(rn connection_params=StdioConnectionParams(rn server_params=StdioServerParameters(rn command=”uv”, rn args=[“run”, path], rn env={**os.environ, “AI_ASSETS_BUCKET”: bucket}rn ),rn timeout=600.0 # Image generation can take timern )rn )’), (‘language’, ‘lang-py’), (‘caption’, <wagtail.rich_text.RichText object at 0x7fbef03f1790>)])]>
Implementing the Nano Banana Pro Server Logic
Now, we will implement the actual logic for this server. This implementation is based on the Agent Factory demo code by Remigiusz Samborski. While Remi’s original code provides instructions for deploying the MCP server to Cloud Run, we will run it here as a local subprocess for faster development and testing.
To get started, create the directory for our new server:
- code_block
- <ListValue: [StructValue([(‘code’, ‘mkdir -p dev_signal_agent/tools/nano_banana_mcprncd dev_signal_agent/tools/nano_banana_mcp’), (‘language’, ”), (‘caption’, <wagtail.rich_text.RichText object at 0x7fbef03f1730>)])]>
The Server Entrypoint (main.py )
This file acts as the “brain” that initializes and starts the MCP server.
-
FastMCP Initialization: We use the
FastMCPlibrary to create a server named “MediaGenerators” and register ourgenerate_imagefunction as a tool -
Safe Logging: The
_initialize_console_loggingfunction is critical. It forces all logs tosys.stderr. This is because the MCP “stdio” transport usessys.stdoutfor communication between the agent and the tool; standard logs sent tostdoutwould corrupt that protocol. -
Execution: The
mcp.run(transport="stdio")line starts the server as a local subprocess, allowing it to listen for requests from your agent via standard input.
Paste this code in dev_signal_agent/tools/nano_banana_mcp/main.py
- code_block
- <ListValue: [StructValue([(‘code’, ‘import loggingrnimport osrnimport sysrnfrom fastmcp import FastMCPrnfrom dotenv import load_dotenvrnfrom nano_banana_pro import generate_imagernrndef _initialize_console_logging(min_level: int = logging.INFO):rn # Ensure logs go to STDERR so they don’t break the MCP stdio protocolrn handler = logging.StreamHandler(sys.stderr)rn logging.basicConfig(level=min_level, handlers=[handler], force=True)rnrntools = [generate_image]rnmcp = FastMCP(name=”MediaGenerators”, tools=tools)rnrnif __name__ == “__main__”:rn load_dotenv()rn _initialize_console_logging()rn mcp.run(transport=”stdio”)’), (‘language’, ‘lang-py’), (‘caption’, <wagtail.rich_text.RichText object at 0x7fbef03f1af0>)])]>
The Generation Logic (nano_banana_pro.py)
This is where the actual image generation happens using Gemini.
-
GenAI Client: We initialize the
genai.Client()to interact with Google’s generative models. -
Model Selection: It specifically targets the
gemini-3-pro-image-previewmodel. We set theresponse_modalitiesto “IMAGE” to tell the model we want pixels, not just text. -
Robustness: The code includes a
MAX_RETRIESloop (set to 5) to handle any transient generation errors, ensuring the agent has multiple attempts to get a valid image. -
Byte Processing: Once the model generates the image, it arrives as raw inline data. We extract these bytes and call our helper to move them to the cloud.
-
URI Conversion: Finally, it replaces the internal
gs://path with a browser-accessiblehttps://URL so the user can actually see the image.
Paste this code in dev_signal_agent/tools/nano_banana_mcp/nano_banana_pro.py
- code_block
- <ListValue: [StructValue([(‘code’, ‘import loggingrnfrom typing import Literal, Optionalrnfrom google import genairnfrom google.genai import typesrnfrom media_models import MediaAssetrnfrom storage_utils import upload_data_to_gcsrnrnAUTHORIZED_URI = “https://storage.mtls.cloud.google.com/”rnMAX_RETRIES = 5rnrnasync def generate_image(rn prompt: str,rn aspect_ratio: Literal[“16:9”, “9:16”] = “16:9”,rn) -> MediaAsset:rn “””Generates an image using Gemini 3 Image model.”””rn genai_client = genai.Client()rn content = types.Content(parts=[types.Part.from_text(text=prompt)], role=”user”)rn rn logging.info(f”Starting image generation for prompt: {prompt[:50]}…”)rn asset = MediaAsset(uri=””)rn rn for _ in range(MAX_RETRIES):rn response = genai_client.models.generate_content(rn model=”gemini-3-pro-image-preview”,rn contents=[content],rn config=types.GenerateContentConfig(rn response_modalities=[“IMAGE”],rn image_config=types.ImageConfig(aspect_ratio=aspect_ratio)rn )rn )rn if response and response.parts:rn for part in response.parts:rn if part.inline_data and part.inline_data.data:rn # Upload the raw bytes to GCSrn gcs_uri = await upload_data_to_gcs(rn “mcp-tools”,rn part.inline_data.data,rn part.inline_data.mime_typern )rn asset = MediaAsset(uri=gcs_uri)rn breakrn if asset.uri: breakrnrn if not asset.uri:rn asset.error = “No image was generated.”rn else:rn # Convert gs:// URI to an HTTP accessible URL if neededrn asset.uri = asset.uri.replace(‘gs://’, AUTHORIZED_URI)rn logging.info(f”Image URL: {asset.uri}”)rn rn return asset’), (‘language’, ‘lang-py’), (‘caption’, <wagtail.rich_text.RichText object at 0x7fbef03f1100>)])]>
GCS Upload Helper (storage_utils.py)
Since agents need a web link to display images, this utility handles the hosting on Google Cloud Storage (GCS).
-
Dynamic Bucket Selection: It looks for a bucket name in your environment variables, falling back from
AI_ASSETS_BUCKETtoLOGS_BUCKET_NAMEto ensure it always has a place to save data. -
Unique Filenames: We use an MD5 hash of the raw image data to create a unique filename. This prevents filename collisions and acts as a simple way to avoid duplicate uploads of the same image.
-
Cloud Upload: The
blob.upload_from_stringmethod pushes the raw image bytes directly to your GCS bucket.
Paste this code in dev_signal_agent/tools/nano_banana_mcp/storage_utils.py
- code_block
- <ListValue: [StructValue([(‘code’, ‘import hashlibrnimport mimetypesrnimport osrnfrom google.cloud.storage import Client, Blobrnfrom dotenv import load_dotenvrnrnload_dotenv()rnstorage_client = Client()rnai_bucket_name = os.environ.get(“AI_ASSETS_BUCKET”) or os.environ.get(“LOGS_BUCKET_NAME”)rnai_bucket = storage_client.bucket(ai_bucket_name)rnrnasync def upload_data_to_gcs(agent_id: str, data: bytes, mime_type: str) -> str:rn file_name = hashlib.md5(data).hexdigest()rn ext = mimetypes.guess_extension(mime_type) or “”rn blob_name = f”assets/{agent_id}/{file_name}{ext}”rn blob = Blob(bucket=ai_bucket, name=blob_name)rn blob.upload_from_string(data, content_type=mime_type, client=storage_client)rn return f”gs://{ai_bucket_name}/{blob_name}”‘), (‘language’, ‘lang-py’), (‘caption’, <wagtail.rich_text.RichText object at 0x7fbef03f11f0>)])]>
Data Model (media_models.py)
This file ensures that our data follows a strict structure (Schema).
-
Structured Output: By using a Pydantic
BaseModel, we guarantee that the tool always returns a consistent JSON object containing auri(the link) and an optionalerrormessage. This makes it much easier for the AI agent to understand and process the tool’s result.
Paste this code in dev_signal_agent/tools/nano_banana_mcp/media_models.py
- code_block
- <ListValue: [StructValue([(‘code’, ‘from typing import Optionalrnfrom pydantic import BaseModelrnrnclass MediaAsset(BaseModel):rn uri: strrn error: Optional[str] = None’), (‘language’, ‘lang-py’), (‘caption’, <wagtail.rich_text.RichText object at 0x7fbef03f19d0>)])]>
Tool Dependencies (requirements.txt)
While we use uv to run our code, a requirements.txt file remains essential because it defines the specific dependencies uv needs to install for the Nano Banana server to function. This provides the necessary “ingredients” to set up the isolated environment before the server starts.
This file lists the three core libraries required for this tool:
-
google-cloud-storage: Used for hosting the generated images on the cloud.
-
google-genai: Provides the logic for the Gemini 3 Pro image generation.
-
fastmcp: The framework that turns our Python script into a standardized MCP tool.
Paste this code in dev_signal_agent/tools/nano_banana_mcp/requirements.txt
- code_block
- <ListValue: [StructValue([(‘code’, ‘google-cloud-storage==3.6.*rngoogle-genai==1.52.*rnfastmcp==2.13.*’), (‘language’, ”), (‘caption’, <wagtail.rich_text.RichText object at 0x7fbef03f1d00>)])]>
Summary
In this first part of our series, we focused on establishing the agent’s core capabilities by standardizing its external integrations through the Model Context Protocol (MCP). We initialized the project using uv for high-speed dependency management and successfully configured three critical toolsets: Reddit for trend discovery, Google Cloud Docs for technical grounding, and a custom “Nano Banana” MCP server for multimodal image generation. By utilizing the Google ADK’s McpToolset, we’ve abstracted away complex API logic into simple, plug-and-play modules, ensuring that our tools share a common interface that decouples integration from intelligence.
For a deeper look into our technical foundation, you can explore the Developer Knowledge MCP server to learn more about knowledge grounding or visit the Google ADK GitHub repository to explore the framework’s core capabilities
With our toolset fully configured and ready for action, we can now move to Part 2, where we will build the multi-agent architecture and integrate the Vertex AI memory bank to orchestrate these capabilities. If you’d like to dive ahead, you can explore the complete code for the entire series in our GitHub repository.
Special thanks to Remigiusz Samborski for the helpful review and feedback on this article.