Software development is far more than just writing code. In reality, a developer spends a large amount of time maintaining existing applications and fixing bugs. For example, migrating a Go application from the older AWS SDK for Go v1 to the newer v2 can be a significant undertaking, but it’s a crucial step to future-proof your application and take advantage of improved features, enhanced performance, and continued support from AWS. As the AWS SDK for Go v1 reaches end-of-support (July 31st 2025), organizations with existing applications relying on this version face the challenge of upgrading to the supported v2 SDK. This upgrade is crucial for continuing to receive security updates and technical support from AWS.
In this post, we’ll explore a step-by-step guide on how to leverage the power of Amazon Q Developer, generative AI–powered assistant for software development, to accelerate the migration process and reduce the technical debt associated with the legacy SDK. Amazon Q Developer currently supports conversations in English and supports more than 15 programming languages for inline code generation, including Python, Java, JavaScript, C#, and Go.
Application Overview
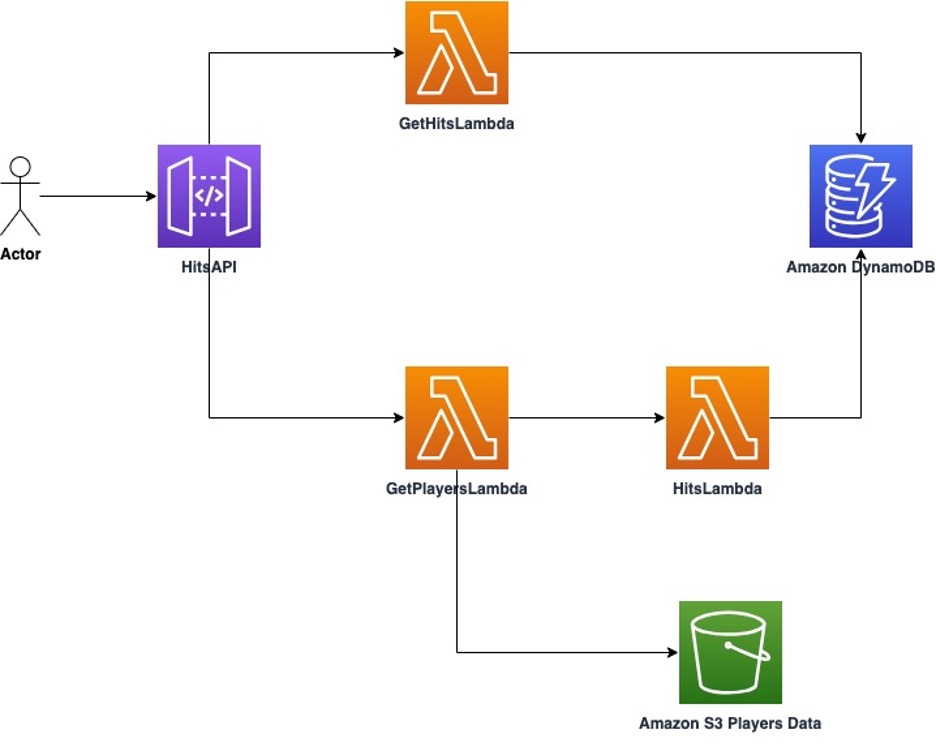
The application has an Amazon API Gateway that fronts an AWS Lambda function which makes a call to Amazon S3 and Amazon DynamoDB, as shown below in figure 1. The entire application is written in Go programming language leveraging AWS SDK for Go v1 and was created using the AWS CDK.

Figure 1: Architecture Diagram of the example application
To get better performance, continued patching support, and support for newer AWS Services, we need to migrate it to use the AWS SDK for Go v2. You can find the sample of this application in this GitHub repository. In the next section, we will walk through how to deploy the app.
Prerequisites
For this part of the blog, you should have the following prerequisites:
- An AWS account
- AWS Command Line Interface (CLI) version 2 or later installed and configured on your workstation.
- git, Node.js, AWS CDK, Go, curl, make and jq to deploy and test the application
- Installation instructions for git, Node.js, AWS CDK, curl, go, make, and jq
Note: You could use Homebrew in macOS or Chocolatey in Windows to install the necessary packages.
- AWS Toolkit installed on Visual Studio Code or Jet Brains Integrated Development Environment (IDE).
- Amazon Q Developer extension installed on your IDE of choice (Amazon Q from the Visual Studio Marketplace or Amazon Q from the JetBrains Marketplace)
- If your organization already has Amazon Q Developer Pro subscription, you can authenticate using the AWS Identity Center (IdC). Or you can authenticate using a free Builder ID.
- Authenticating in Visual Studio Code
- Authenticating in JetBrains IDEs
Deploy Sample Go Environment
The following steps will guide you through deploying the sample Go project to your account.
- First, perform a
git cloneof this sample Go project found here. - If you haven’t used AWS CDK to deploy to a specific AWS account and region before, you’ll need to run
cdk bootstraponce for that account/region combination. This sets up the necessary resources for CDK to work. For more details, refer to cdk bootstrap. If you’ve already runcdk bootstrapfor this account and region, you can skip this step.$ cdk bootstrap aws://<account ID>/<region> - Next, use the cdk deploy –all command to deploy all stacks to your default AWS account/region. There are a total of two stacks to deploy DynamoDBStack and GoSdkAmazonQStack.
$ cdk deploy --allType
yto confirm the prompt for the DynamoDBStack stack and GoSdkAmazonQStack stack - When the deployment is complete, copy the API Gateway endpoint URL under Outputs: for the next step as shown in figure 2.

Figure 2: API Gateway URL (Click Image to Enlarge)
- After deploying the CDK sample Go stacks, we’ll test the sample application using a curl command with the endpoint URL from the previous step. Query the application for players named Carlos by appending
getPlayers/?firstName=Carlos | jqto your URL.
Mac / Linux
$ curl -sX GET "https://{Enter your Hits API Endpoint URL here}/getPlayers/?firstName=Carlos" | jq
Windows – PowerShell
> (Invoke-WebRequest -Uri "https://{Enter your Hits API Endpoint URL here}/getPlayers/?firstName=Carlos").Content | jq
- Run the
curlcommand and confirm you see the following output:
{
    "player_id": "8",
    "lastName": "Hernandez",
    "firstname": "Carlos",
    "dob": "1988-06-18",
    "plays": "Right",
    "countryOfBirth": "Spain",
    "countryOfResidence": "Spain"
}
This API response from our Go application confirms the application is working. Next, we will use Amazon Q Developer to help us analyze code and generate documentation or code.
Analyze existing code with Amazon Q Developer
The Amazon Q Developer Agent for software development can help you develop code features or make code changes to projects in your IDE. The following steps will guide you through using Amazon Q developer in your IDE to help you get familiar with our Application code using AWS SDK for Go v1 and to create a README.md file using /doc feature.
- Open the project folder Go SDK Amazon Sample Project from the previous steps in your IDE.
- Click the Amazon Q Developer icon in your IDE to show the Amazon Q chat panel as shown in figure 3.

Figure 3: Amazon Q integration button in Visual Studio
- Enter
/doc(this alerts Q to generate documentation) in the Amazon Q chat pane and select Create a README as shown in figure 4.
Figure 4: Amazon Q Chat window in Visual Studio (VS) Code (Click Image to Enlarge)
The prompt you pass to Amazon Q Developer instructs Amazon Q Developer to analyze your code and create a new README.md file in minutes. Accept the new code for README.md. The raw output you get from Amazon Q Developer might look like the following screenshot as per figure 5.

Figure 5: Amazon Q generated README.md file (Click Image to Enlarge)
From the example output, you can see Amazon Q Developer has analyzed the code and filled in the details using the topics and structure we stated in the prompt. Results may vary due to non-deterministic nature of Generative AI). This functionality helps developers save time and effort in writing documentation for their code contributions.
Upgrade using Amazon Q
Let’s use the /dev feature in the Amazon Q chat panel again to upgrade our application from AWS SDK for Go v1 to v2. Our prompt follows the recommend best practices to make most out of Amazon Q Developer Agent for software development.
- Click the Amazon Q Developer icon in your IDE to show the Amazon Q chat panel and insert prompt text below:
/dev
I'm a senior software engineer from AWS, working on migrating from AWS Sdk V1 to V2. In this context, I need to replace every usage of AWS Sdk V1 by AWS Sdk V2 in my updateplayer.go file and make the changes in place.
In particular, here I want to convert the usage of session.NewSession to config.LoadDefaultConfig.
Here is an example:
// v1
sess, err := session.NewSession(&aws.Config{
  Region: aws.String("etc"),
  HTTPClient: &http.Client{ /* ... */ },
  // ... map fields as appropriate
})
// v2
cfg := config.LoadDefaultConfig(context.TODO(), func (o config.LoadOptions) error {
  o.Region = "etc"
  o.HTTPClient = &http.Client{ / ... */ }
  return nil
})
Important: If you're unsure about the fix, do NOT proceed rather than outputing incorrect code.
Figure 6: Animated demonstration of Amazon Q’s /dev feature (Click Image to Enlarge)
Once Amazon Q developer finishes processing and generates new code, you can select Accept All Changes to save Amazon Q Developer changes to your local machine. Figure 7 & Figure 8 are code snippets showing Q developer’s code changes.

Figure 7: Note the changes in the import section of Go application code going from “aws-sdk-go” to using “aws-sdk-go-v2” modules (Click Image to Enlarge)

Figure 8: Amazon Q Developer has upgraded the session object to AWS SDK for Go v2 SDK coding style, which enables the application to write to a DynamoDB table (Click Image to Enlarge)
Amazon Q Developer can make tedious task like code refactoring a breeze with the right prompt request. Next, let’s get our new code built and deployed to your AWS infrastructure.
Build, Deploy, and Test
- Accept all code changes Amazon Q Developer in the chat panel.
- Return to your terminal session at the root of the cloned project directory and run
makecommands that will recompile the updatePlayer Go binary.$ go mod tidy && make updatePlayerNote:
makecommand could take 35 to 45 minutes depending on the local machine’s capacity. - Once the new Go code has been recompiled, we need to redeploy the CDK stack.
$ cdk deploy --all - Now that you have redeployed the CDK stack with the updated Amazon Q Developer code, let’s test to confirm that the new code is working as expected. Run the API command you ran in Step 1: Deploy Sample Go Environment
Mac / Linux
$ curl -sX GET "https://{Enter your Hits API Endpoint URL here}/getPlayers/?firstName=Carlos" | jq
Windows – PowerShell
> (Invoke-WebRequest -Uri "https://{Enter your Hits API Endpoint URL here}/getPlayers/?firstName=Carlos").Content | jq
- If you get the same API response you got in Step 1: Deploy Sample Go Environment, you have now successfully refactored the Go code using Amazon Q Developer!
If any errors occur you can use Amazon Q Developer to debug the issue and provide the needed inputs to resolve it.
Clean up
To avoid incurring charges and to delete the resources you have created, run the command below:
$ cdk destroy --all
Conclusion
By embracing this transformation now, you’ll not only ensure continued security updates and technical support but also gain access to enhanced performance features and newer AWS services. Don’t wait until the deadline – empower your development team with Amazon Q Developer and transform your migration journey from a challenge into an opportunity for innovation.
Ready to begin? Visit the Amazon Q Developer product page to get started, or engage with the AWS community through AWS re:Post for additional support and guidance.