For AI-powered agents to perform useful, real-world tasks, they need to reliably access tools and up-to-the-minute information that lives outside the base model. Anthropic’s Model Context Protocol (MCP) is designed to address this, providing a standardized way for agents to retrieve that crucial, external context needed to inform their responses and actions.
This is vital for developers who need to build and deploy sophisticated agents that can leverage enterprise data or public tools. But integrating agents built with Google’s Agent Development Kit (ADK) to communicate effectively with an MCP server, especially one hosted externally, might present some integration challenges.
Today, we’ll guide you through developing ADK agents that connect to external MCP servers, initially using Server-Sent Events (SSE). We’ll take an example of an ADK agent leveraging MCP to access Wikipedia articles, which is a common use case to retrieve external specialised data. We will also introduce Streamable HTTP, the next-generation transport protocol designed to succeed SSE for MCP communications.
A quick refresher
Before we start, let’s make sure we all understand the following terms:
-
SSE enables servers to push data to clients over a persistent HTTP connection. In a typical setup for MCP, this involved using two distinct endpoints: one for the client to send requests to the server (usually via HTTP POST) and a separate endpoint where the client would establish an SSE connection (HTTP GET) to receive streaming responses and server-initiated messages.
-
MCP is an open standard designed to standardize how Large Language Models (LLMs) interact with external data sources, APIs and resources as agent tools, MCP aims to replace the current landscape of fragmented, custom integrations with a universal, standardized framework.
-
Streamable HTTP utilizes a single HTTP endpoint for both sending requests from the client to the server, and receiving responses and notifications from the server to the client.
- aside_block
- <ListValue: [StructValue([(‘title’, ‘$300 in free credit to try Google Cloud developer tools’), (‘body’, <wagtail.rich_text.RichText object at 0x3e943d2536a0>), (‘btn_text’, ‘Start building for free’), (‘href’, ‘http://console.cloud.google.com/freetrial?redirectPath=/welcome’), (‘image’, None)])]>
Step 1: Create an MCP server
You need the following python packages installed in your virtual environment before proceeding. We will be using the uv tool in this blog.
- code_block
- <ListValue: [StructValue([(‘code’, ‘”beautifulsoup4==4.12.3″,rn”google-adk==0.3.0″,rn”html2text==2024.2.26″,rn”mcp[cli]==1.5.0″,rn”requests==2.32.3″‘), (‘language’, ‘lang-py’), (‘caption’, <wagtail.rich_text.RichText object at 0x3e943d253610>)])]>
Here’s an explanation of the Python code server.py:
-
It creates an instance of an MCP server using
FastMCP -
It defines a tool called
extract_wikipedia_articledecorated with@mcp.tool -
It configures an SSE transport mechanism
SseServerTransportto enable real-time communication, typically for the MCP server interactions. -
It creates a web application instance using the Starlette framework and defines two routes,
messageandsse. -
You can read more about SSE transport protocol here.
- code_block
- <ListValue: [StructValue([(‘code’, ‘# File server.pyrnrnimport requestsrnfrom requests.exceptions import RequestExceptionrnfrom bs4 import BeautifulSouprnfrom html2text import html2textrnrnimport uvicornrnfrom starlette.applications import Starletternfrom starlette.requests import Requestrnfrom starlette.routing import Route, Mountrnrnfrom mcp.server.fastmcp import FastMCPrnfrom mcp.shared.exceptions import McpErrorrnfrom mcp.types import ErrorData, INTERNAL_ERROR, INVALID_PARAMSrnfrom mcp.server.sse import SseServerTransportrnrn# Create an MCP server instance with an identifier (“wiki”)rnmcp = FastMCP(“wiki”)rnrn@mcp.tool()rndef extract_wikipedia_article(url: str) -> str:rn “””rn Retrieves and processes a Wikipedia article from the given URL, extractingrn the main content and converting it to Markdown format.rnrn Usage:rn extract_wikipedia_article(“https://en.wikipedia.org/wiki/Gemini_(chatbot)”)rn “””rn try:rn if not url.startswith(“http”):rn raise ValueError(“URL must begin with http or https protocol.”)rnrn response = requests.get(url, timeout=8)rn if response.status_code != 200:rn raise McpError(rn ErrorData(rn code=INTERNAL_ERROR,rn message=f”Unable to access the article. Server returned status: {response.status_code}”rn )rn )rn soup = BeautifulSoup(response.text, “html.parser”)rn content_div = soup.find(“div”, {“id”: “mw-content-text”})rn if not content_div:rn raise McpError(rn ErrorData(rn code=INVALID_PARAMS,rn message=”The main article content section was not found at the specified Wikipedia URL.”rn )rn )rn markdown_text = html2text(str(content_div))rn return markdown_textrnrn except Exception as e:rn raise McpError(ErrorData(code=INTERNAL_ERROR, message=f”An unexpected error occurred: {str(e)}”)) from ernrnsse = SseServerTransport(“/messages/”)rnrnasync def handle_sse(request: Request) -> None:rn _server = mcp._mcp_serverrn async with sse.connect_sse(rn request.scope,rn request.receive,rn request._send,rn ) as (reader, writer):rn await _server.run(reader, writer, _server.create_initialization_options())rnrnapp = Starlette(rn debug=True,rn routes=[rn Route(“/sse”, endpoint=handle_sse),rn Mount(“/messages/”, app=sse.handle_post_message),rn ],rn)rnrnif __name__ == “__main__”:rn uvicorn.run(app, host=”localhost”, port=8001)’), (‘language’, ‘lang-py’), (‘caption’, <wagtail.rich_text.RichText object at 0x3e943d2539a0>)])]>
To start the server, you can run the command uv run server.py.
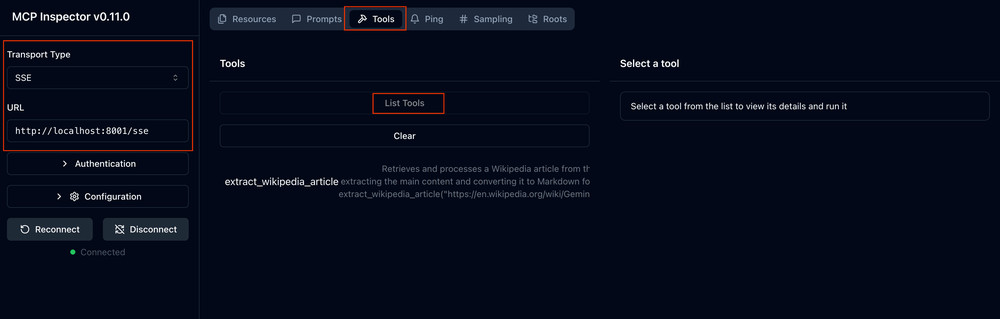
Bonus tip, to debug the server using MCP Inspector, execute the command uv run mcp dev server.py.

Step 2: Attach the MCP server while creating ADK agents
The following explains the Python code in the file agent.py:
-
Uses
MCPToolset.from_serverwithSseServerParamsto establish a SSE connection to a URI endpoint. For this demo we will usehttp://localhost:8001/sse, but in production this would be a remote server. -
Create an ADK Agent and call
get_tools_asyncto get the tools from the MCP server.
- code_block
- <ListValue: [StructValue([(‘code’, ‘# File agent.pyrnrnimport asynciornimport jsonrnfrom typing import Anyrnrnfrom dotenv import load_dotenvrnfrom google.adk.agents.llm_agent import LlmAgentrnfrom google.adk.artifacts.in_memory_artifact_service import (rn InMemoryArtifactService, # Optionalrn)rnfrom google.adk.runners import Runnerrnfrom google.adk.sessions import InMemorySessionServicernfrom google.adk.tools.mcp_tool.mcp_toolset import (rn MCPToolset,rn SseServerParams,rn)rnfrom google.genai import typesrnfrom rich import printrnload_dotenv()rnrnasync def get_tools_async():rn “””Gets tools from the File System MCP Server.”””rn tools, exit_stack = await MCPToolset.from_server(rn connection_params=SseServerParams(rn url=”http://localhost:8001/sse”,rn )rn )rn print(“MCP Toolset created successfully.”)rn return tools, exit_stackrnrnasync def get_agent_async():rn “””Creates an ADK Agent equipped with tools from the MCP Server.”””rn tools, exit_stack = await get_tools_async()rn print(f”Fetched {len(tools)} tools from MCP server.”)rn root_agent = LlmAgent(rn model=”gemini-2.0-flash”,rn name=”assistant”,rn instruction=”””Help user extract and summarize the article from wikipedia link.rn Use the following tools to extract wikipedia article:rn – extract_wikipedia_articlernrn Once you retrieve the article, always summarize it in a few sentences for the user.rn “””,rn tools=tools,rn )rn return root_agent, exit_stackrnrnroot_agent = get_agent_async()’), (‘language’, ‘lang-py’), (‘caption’, <wagtail.rich_text.RichText object at 0x3e943d253100>)])]>
Step 3: Test your agent
We will use the ADK developer tool to test the agent.
Create the following directory structure:
- code_block
- <ListValue: [StructValue([(‘code’, ‘. # <–Your current directoryrn├── adk-agentrn│ ├── __init__.pyrn│ └── agent.pyrn├── .env’), (‘language’, ‘lang-py’), (‘caption’, <wagtail.rich_text.RichText object at 0x3e943d253f10>)])]>
The content for __init__.py and .env are as follows:
- code_block
- <ListValue: [StructValue([(‘code’, ‘# .envrnGOOGLE_GENAI_USE_VERTEXAI=”True”rnGOOGLE_CLOUD_PROJECT=<YOUR_PROJECT_ID>rnGOOGLE_CLOUD_LOCATION=”us-central1″‘), (‘language’, ‘lang-py’), (‘caption’, <wagtail.rich_text.RichText object at 0x3e943d2530d0>)])]>
- code_block
- <ListValue: [StructValue([(‘code’, ‘# __init__.pyrnfrom . import agent’), (‘language’, ‘lang-py’), (‘caption’, <wagtail.rich_text.RichText object at 0x3e943d253bb0>)])]>
Start the UI with the following command:
- code_block
- <ListValue: [StructValue([(‘code’, ‘uv run adk web’), (‘language’, ‘lang-py’), (‘caption’, <wagtail.rich_text.RichText object at 0x3e943d2537c0>)])]>
This will open up the ADK developer tool interface as shown below:

Streamable HTTP
It is worth noting that in March 2025, MCP released a new transport protocol called Streamable HTTP. The Streamable HTTP transport allows a server to function as an independent process managing multiple client connections via HTTP POST and GET requests. Servers can optionally implement Server-Sent Events (SSE) for streaming multiple messages, enabling support for basic MCP servers as well as more advanced servers with streaming and server-initiated communication.
The following code demonstrates how to implement a Streamable HTTP server, where the tool extract_wikipedia_article will return a dummy string to simplify the code.
- code_block
- <ListValue: [StructValue([(‘code’, ‘# File server.pyrnrnimport contextlibrnimport loggingrnfrom collections.abc import AsyncIteratorrnrnimport anyiornimport mcp.types as typesrnfrom mcp.server.lowlevel import Serverrnfrom mcp.server.streamable_http_manager import StreamableHTTPSessionManagerrnfrom starlette.applications import Starletternfrom starlette.routing import Mountrnfrom starlette.types import Receive, Scope, Sendrnimport uvicornrnrnlogger = logging.getLogger(__name__)rnrnrnapp = Server(“mcp-streamable-http-stateless-demo”)rnrnrn@app.call_tool()rnasync def call_tool(rn name: str, arguments: dictrn) -> list[types.TextContent | types.ImageContent | types.EmbeddedResource]:rn # Check if the tool is extract-wikipedia-articlern if name == “extract-wikipedia-article”:rn # Return dummy content for the Wikipedia articlern return [rn types.TextContent(rn type=”text”,rn text=”This is the article …”,rn )rn ]rnrn # For other tools, keep the existing notification logicrn ctx = app.request_contextrn interval = arguments.get(“interval”, 1.0)rn count = arguments.get(“count”, 5)rn caller = arguments.get(“caller”, “unknown”)rnrn # Send the specified number of notifications with the given intervalrn for i in range(count):rn await ctx.session.send_log_message(rn level=”info”,rn data=f”Notification {i + 1}/{count} from caller: {caller}”,rn logger=”notification_stream”,rn related_request_id=ctx.request_id,rn )rn if i < count – 1: # Don’t wait after the last notificationrn await anyio.sleep(interval)rnrn return [rn types.TextContent(rn type=”text”,rn text=(rn f”Sent {count} notifications with {interval}s interval”rn f” for caller: {caller}”rn ),rn )rn ]rnrnrn@app.list_tools()rnasync def list_tools() -> list[types.Tool]:rn return [rn types.Tool(rn name=”extract-wikipedia-article”,rn description=(“Extracts the main content of a Wikipedia article”),rn inputSchema={rn “type”: “object”,rn “required”: [“url”],rn “properties”: {rn “url”: {rn “type”: “string”,rn “description”: “URL of the Wikipedia article to extract”,rn },rn },rn },rn )rn ]rnrnrnsession_manager = StreamableHTTPSessionManager(rn app=app,rn event_store=None,rn stateless=True,rn)rnrnrnasync def handle_streamable_http(scope: Scope, receive: Receive, send: Send) -> None:rn await session_manager.handle_request(scope, receive, send)rnrnrn@contextlib.asynccontextmanagerrnasync def lifespan(app: Starlette) -> AsyncIterator[None]:rn “””Context manager for session manager.”””rn async with session_manager.run():rn logger.info(“Application started with StreamableHTTP session manager!”)rn try:rn yieldrn finally:rn logger.info(“Application shutting down…”)rnrnrnapp = Starlette(rn debug=True,rn routes=[rn Mount(“/mcp”, app=handle_streamable_http),rn ],rn lifespan=lifespan,rn)rnrnif __name__ == “__main__”:rn uvicorn.run(app, host=”localhost”, port=3000)’), (‘language’, ‘lang-py’), (‘caption’, <wagtail.rich_text.RichText object at 0x3e943d253850>)])]>
You can start the Streamable HTTP MCP server using by running the following:
- code_block
- <ListValue: [StructValue([(‘code’, ‘# Start the serverrnuv run server.py’), (‘language’, ‘lang-py’), (‘caption’, <wagtail.rich_text.RichText object at 0x3e943d253970>)])]>
To debug with MCP Inspector, select Streamable HTTP and fill in the MCP Server URL http://localhost:3000/mcp.

Authentication
For production deployments of MCP servers, robust authentication is a critical security consideration. As this field is under active development at the time of writing, we recommend referring to the MCP specification on Authentication for more information.
For an enterprise grade API governance system which, similar to MCP, can generate agent tools:
-
Apigee centralizes and manages any APIs, with full control, versioning, and governance
-
API Hub organizes metadata for any API and documentation
-
Application Integrations support many existing API connections with user access control support
-
ADK supports these Google Cloud Managed Tools with about the same number of lines of code
Get started
To get started today, read the documentation for ADK. You can create your own Agent with access to available MCP servers in the open community with ADK.