Our agent runs in the cloud, but our users’ spreadsheets live on their laptops. How do you bridge that gap?
The Model Context Protocol (MCP) is an open source standard introduced by Anthropic in November 2024 to standardize how AI models connect to external data and tools. MCP follows a client-server architecture where an MCP host, an AI application like Amazon Quick or Claude Code, establishes connections to one or more MCP servers. The MCP protocol supports two transport mechanisms: stdio (standard I/O for communication between local processes on the same machine) and streamable HTTP transport (HTTP-based communication between remote servers and clients). A missing piece is when the MCP server exists locally and the MCP client is remote.
This pattern matters for financial managers and analysts who primarily work with Excel and local files. They can use centrally deployed AI agents to act on those files while also drawing context from their browser. This is the same pattern that powers products like Claude Cowork, a cloud agent calling local tools through MCP, but fully self-hosted on AWS with your own model and custom tool servers. Internally, we built a production-grade AI assistant for finance that has seen over 41,000 conversations within a year since launch.
In this post, we recreate what we built internally in a simplified form. Our agent, deployed on Amazon Bedrock AgentCore, uses MCP servers that run on a user’s local machine. We bridge the gap between the remote MCP client and the local MCP server by tunneling MCP messages over WebSocket and native messaging. We discuss additional production hardening measures in the What’s Next section. The complete source code is available on GitHub.
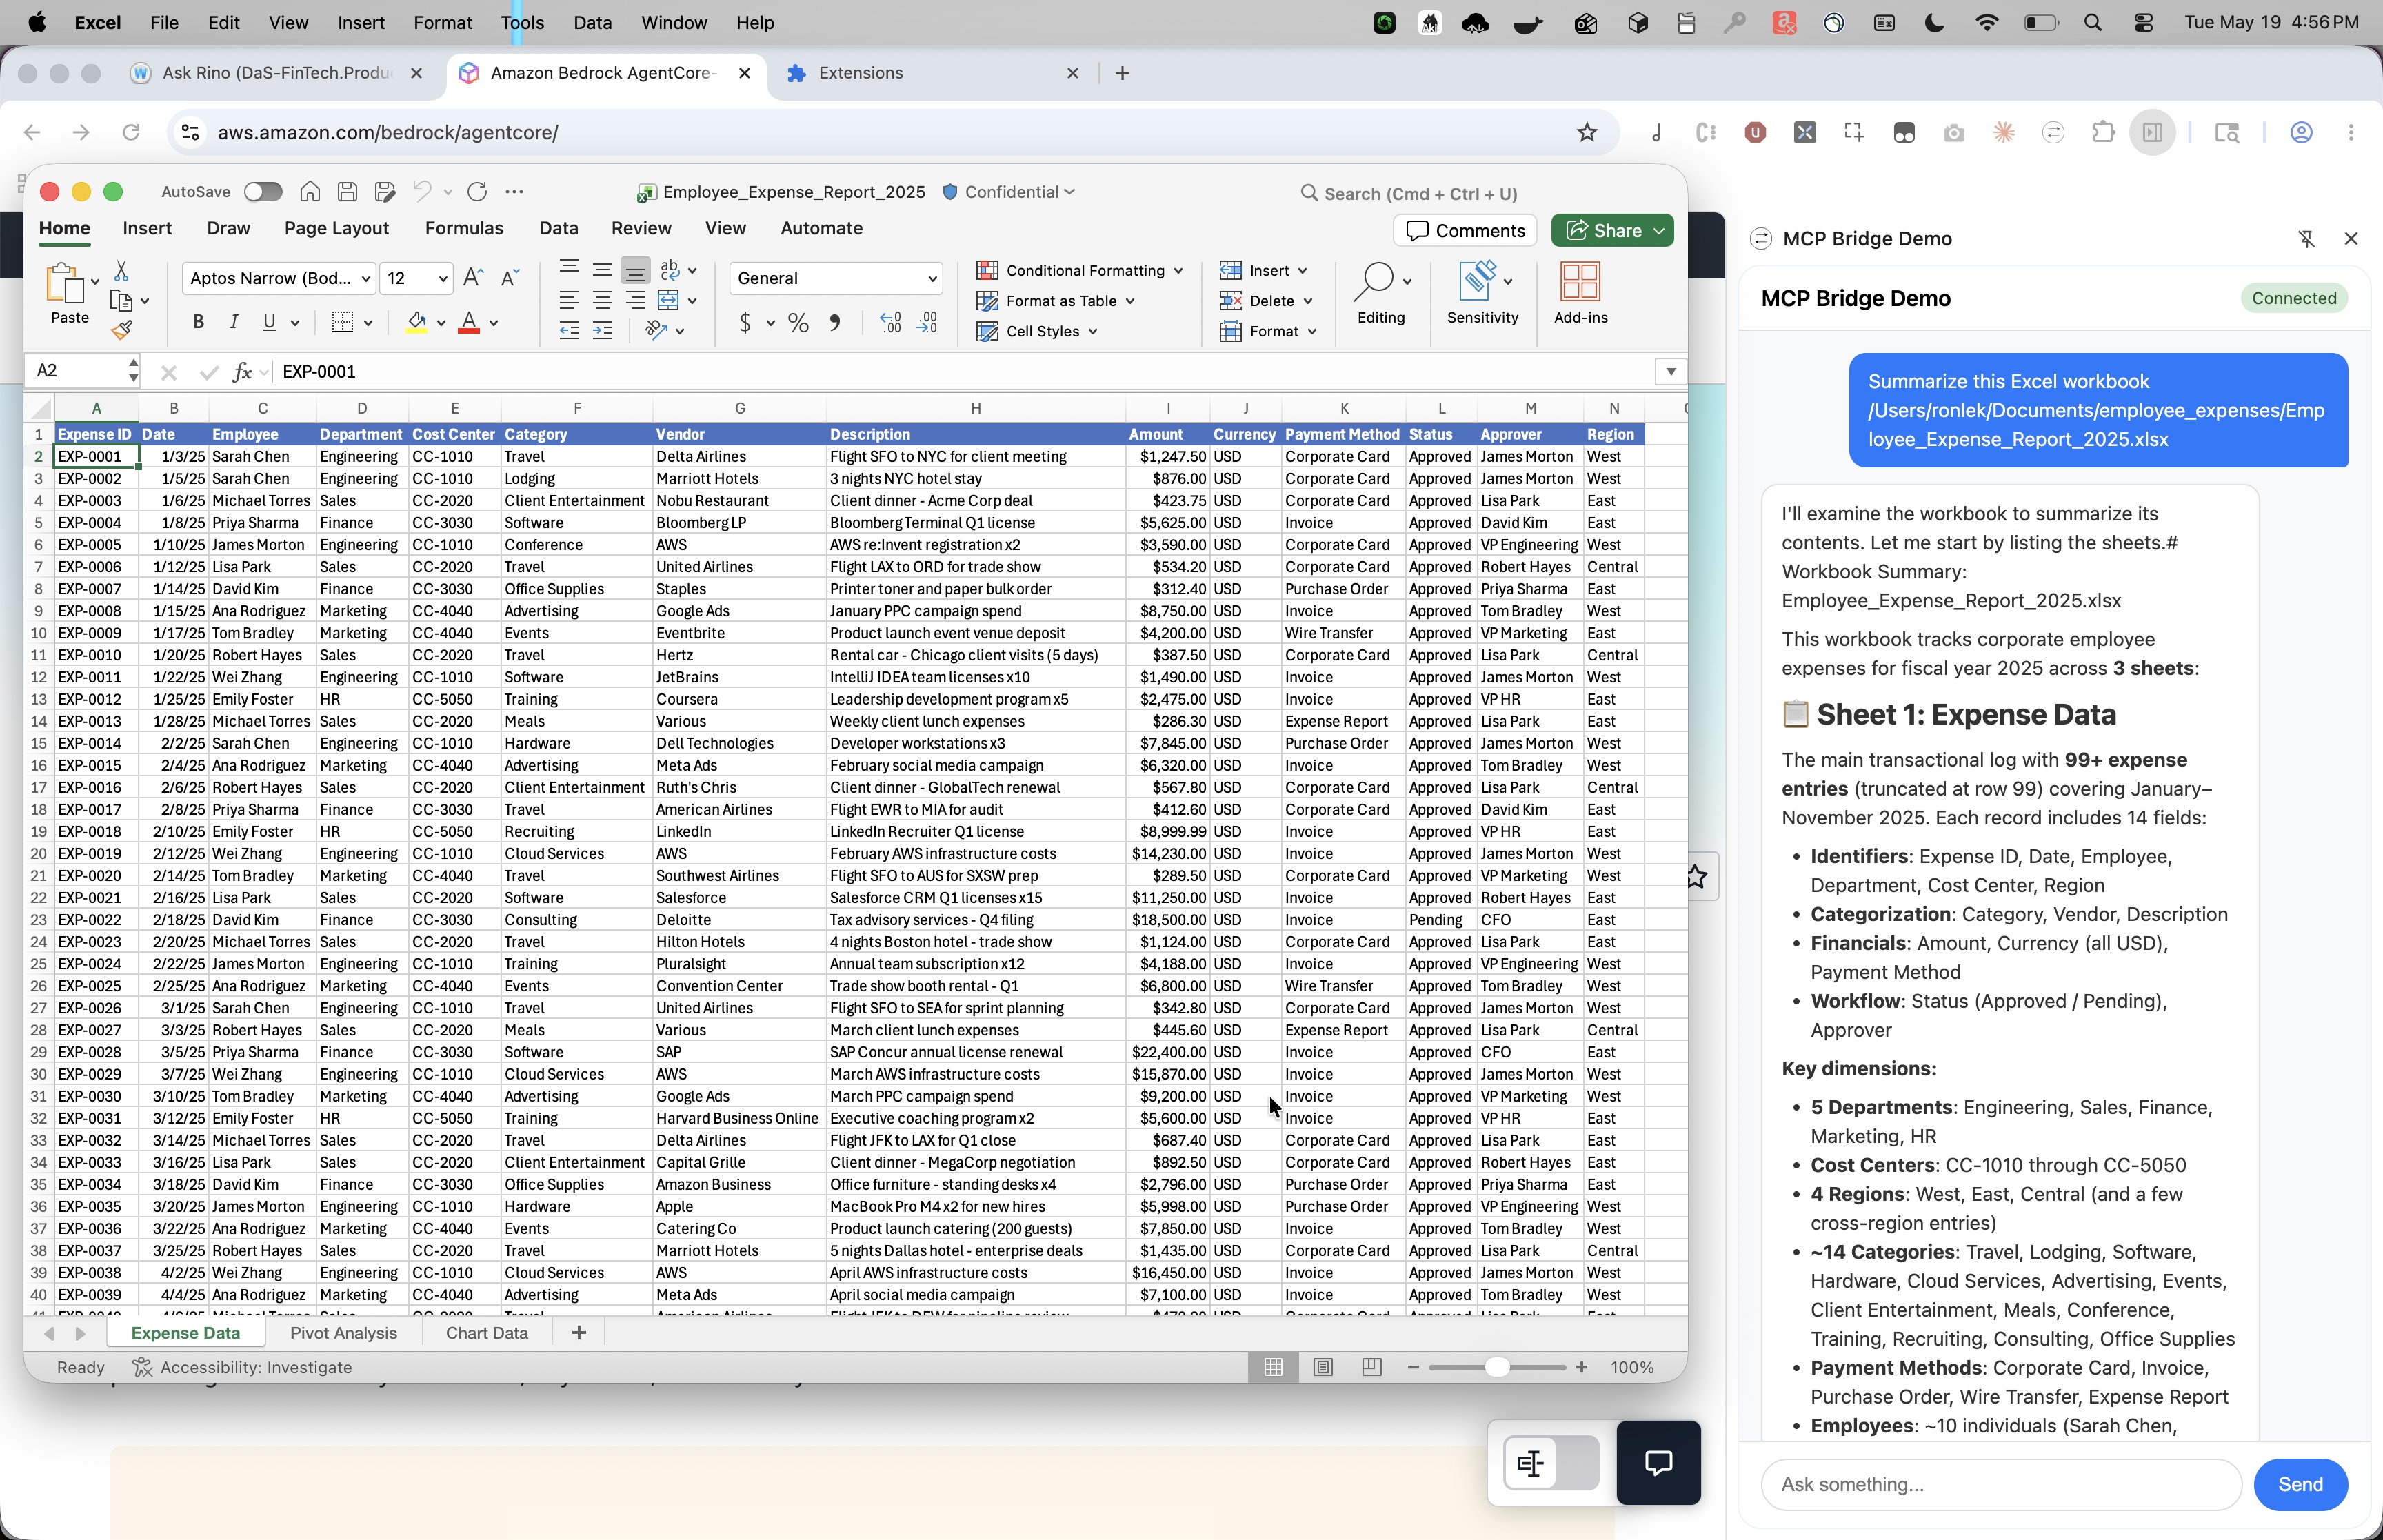
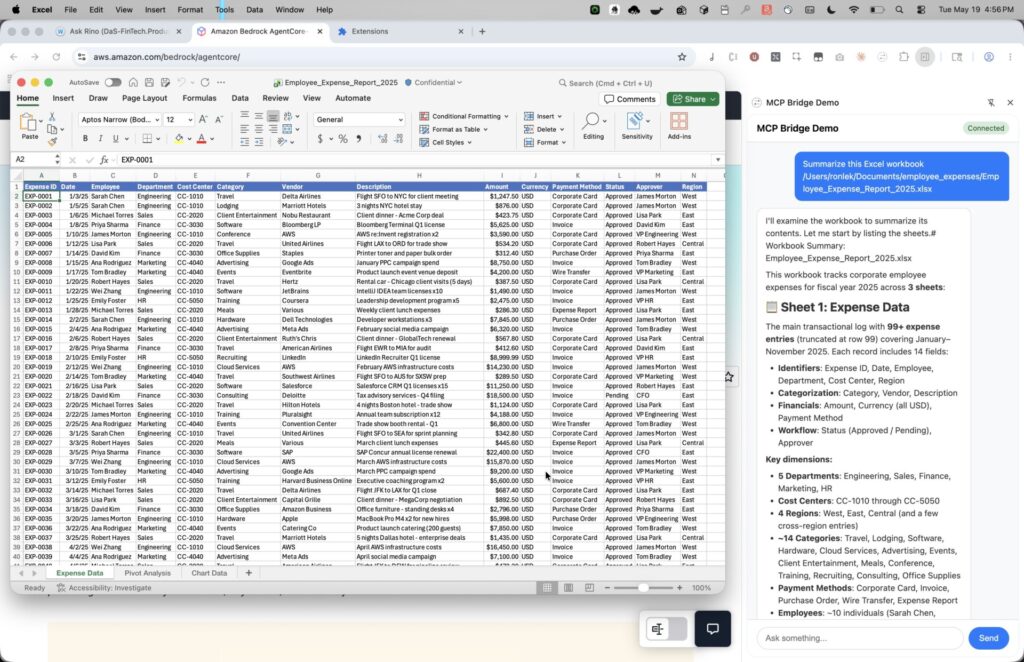
The MCP Bridge Demo extension summarizing a local Excel workbook. The cloud-hosted agent reads the file directly from the user’s machine through the MCP bridge and streams a structured summary back to the side panel
Architecture overview
The AgentCore runtime, a capability of Amazon Bedrock AgentCore, anchors an architecture with four components:
- AgentCore runtime: Hosts the Strands agent in the cloud. The agent acts as the MCP client, issuing tool discovery and tool invocation requests.
- Browser extension: Provides the chat interface and acts as a bidirectional relay, forwarding MCP messages between the AgentCore runtime (over WebSocket) and the MCP Bridge (over native messaging).
- MCP Bridge: A FastMCP proxy running on the user’s local machine, spawned by the browser through the native messaging host registration. It translates between the native messaging envelope format and raw MCP JSON-RPC.
- MCP Server: A standard MCP server running locally. Because the bridge is co-located, communication uses the stdio transport.
The following diagram shows the end-to-end message flow. The user sends a message through the extension, which connects to the AgentCore runtime over a presigned WebSocket. When the Strands agent needs to call a tool, it sends an MCP JSON-RPC request wrapped in a JSON envelope back through the WebSocket to the extension. The extension relays the message as-is to the bridge through native messaging. The bridge unwraps the envelope, extracts the JSON-RPC content, and forwards it to the MCP server over stdio. The response travels the reverse path. The bridge wraps the unmodified MCP server response back into an envelope and relays it through the extension to the AgentCore runtime, where the agent consumes the tool result and continues generation.
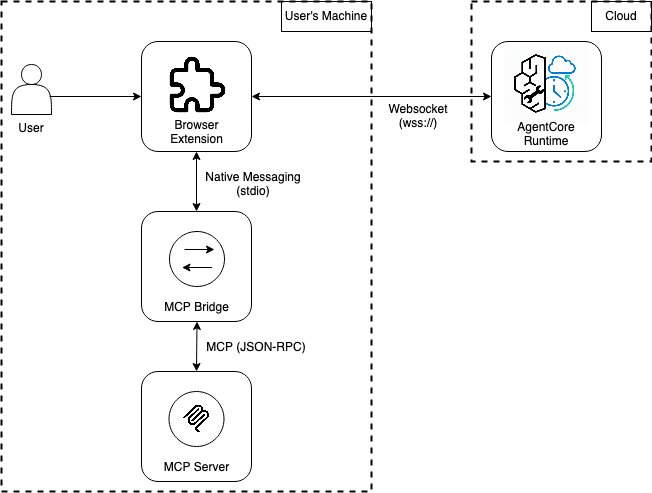
High-level architecture diagram showing all components. The browser extension and MCP Bridge act as relays that wrap and unwrap JSON messages from the AgentCore runtime and JSON-RPC messages from the MCP server
The following table shows a single tool call as it travels from the agent to the MCP server, with each hop stripping one layer of wrapping:
| Hop | Sender → Receiver | Message |
| 1 | Agent -> Extension (WebSocket) | {“type”: “mcpbridge”, “content”: {“type”: “mcp”, “payload”: “”}, “session_id”: “session_123”} |
| 2 | Extension -> Bridge (Native Messaging) | {“type”: “mcp”, “payload”: “”} |
| 3 | Bridge → MCP Server (stdio) | {“jsonrpc”: “2.0”, “id”: 1, “method”: “tools/call”, “params”: {“name”: “read_sheet”, “arguments”: {“file_path”: “budget.xlsx”}}} |
How does the Strands agent work in AgentCore runtime
WebSocket connection: The browser extension connects to the AgentCore runtime over a presigned WebSocket URL. On startup, the side panel sends a presign request through the background script to the native bridge, which uses the user’s local AWS credentials and the bedrock-agentcore software development kit (SDK) to generate a SigV4-signed wss:// URL scoped to the deployed runtime ARN (valid for 5 minutes). The side panel opens a WebSocket to that URL. No credentials ever leave the user’s machine or enter the browser. If the connection drops because of URL expiry or network interruption, the side panel automatically requests a fresh presigned URL after 2 seconds and reconnects, making the expiry window invisible to the user during normal use.
MCP initialization: Before discovering tools, the agent performs the standard MCP initialization handshake. It sends an initialize request with the protocol version, waits for the server’s capabilities response, and then sends a notifications/initialized notification. Only after this handshake completes does the server accept tools/list and tools/call requests.
Tool discovery: On each user message, the agent calls tools/list and receives an array of tool schemas. It wraps each schema into a Strands AgentTool whose stream() method sends a tools/call request through the bridge. Tools added to the MCP server are automatically available on the next request with no agent code changes.
Request-response correlation: Each outbound JSON-RPC request from the agent is assigned a unique ID and registered against an asyncio.Future keyed by (session_id, jsonrpc_id). When the response arrives back over the WebSocket, it is matched to the waiting Future and resolved. This allows multiple tool calls to be in flight concurrently without ambiguity.
How does native messaging work
We need the extension to talk to a long-running local process without network permissions or per-message user prompts. Native messaging provides exactly this. Both Chrome and Firefox support native messaging for their extensions. The browser looks for a manifest file at a well-known location on the user’s machine that specifies which binary to launch. The native messaging manifest file for Chrome on macOS is as follows:
On extension startup, the background script calls chrome.runtime.connectNative("com.example.mcp_bridge") to launch the native app locally. The run_bridge.sh script referenced in the manifest activates the Python environment and starts the bridge:
The native messaging host process stays alive for the lifetime of the connection. Each message is serialized as JSON, UTF-8 encoded, and preceded with a 32-bit message length in little-endian byte order. The maximum size of a single message from the native messaging host is 1 MB (to protect the browser from misbehaving native applications). The maximum size of a message sent to the native messaging host is 64 MiB.
How does the MCP Bridge work
The MCP Bridge acts as a protocol translator between two worlds: Chrome’s native messaging protocol on one side and the MCP standard (JSON-RPC 2.0 over stdio) on the other. On the inbound path, it strips the 4-byte length header from stdin, parses the JSON body, and unwraps the envelope to extract the raw JSON-RPC message. On the outbound path, it does the reverse: wraps the JSON-RPC response in an envelope and writes it back with the length header. The JSON-RPC content itself passes through untouched.
Internally, the bridge runs two concurrent loops connected through a FastMCP proxy. The main loop reads messages from the browser, unwraps them, and places the JSON-RPC content onto an input queue. The FastMCP proxy, started once and kept alive for the bridge’s lifetime, picks messages off this queue, forwards them to the MCP server subprocess over its stdin, and places responses from the server’s stdout onto an output queue. A second background loop reads from the output queue, wraps each response back into an envelope, and writes it to stdout for the browser to receive. This two-loop design decouples the browser’s request timing from the MCP server’s processing speed so the bridge does not block waiting for a slow tool to finish before accepting the next request.
The MCP server itself is a child process spawned by the bridge on startup, configured through a mcp.json file. It stays running for the bridge’s lifetime with no per-request process overhead. Adding a new MCP server is a one-line config change. The bridge handles the plumbing.
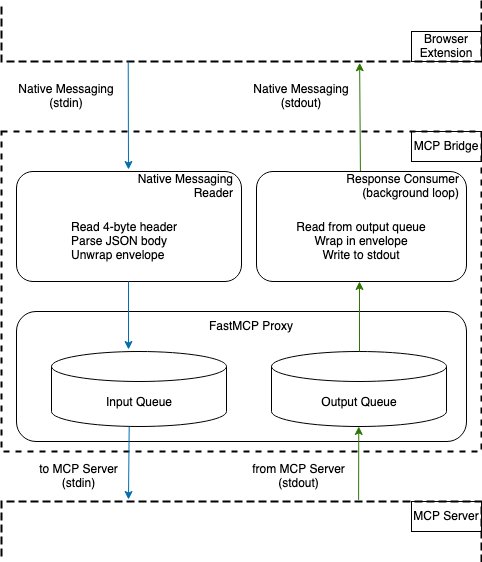
Internal architecture of the MCP Bridge. The MCP Bridge translates messages from the browser extension into the MCP protocol for the MCP server. I/O queues work with a FastMCP proxy server to forward messages to the locally running MCP server and relay messages back to the browser extension
Prerequisites
The following prerequisites are needed to deploy and test the MCP bridge solution. These cover the browser extension, the agent deployed on AgentCore, the MCP Bridge, and a sample Excel MCP server.
AWS account and permissions
- AWS account with Bedrock model access enabled (the code uses Claude Opus 4.7). Model availability varies by Region. See the Amazon Bedrock model availability documentation for the current list.
- AWS Identity and Access Management (IAM) permissions for Bedrock AgentCore (
bedrock-agentcore:*), AWS CloudFormation, IAM role creation, and S3. - AWS Command Line Interface (AWS CLI) configured with credentials (
aws sts get-caller-identityto verify). - AWS Cloud Development Kit (AWS CDK) bootstrapped in your target Region (
cdk bootstrap).
Tools and software
- Python 3.10+.
- Node.js 20+ (for the AgentCore command line interface (CLI)).
- Google Chrome (Manifest V3 side panel support).
- Git.
Install
- AgentCore CLI:
npm install -g @aws/agentcore. - AWS CDK:
npm install -g aws-cdk.
Estimated time and cost
- Setup: ~15 minutes (deploy, install extension, and register bridge).
- AgentCore runtime: pay-per-invocation (no idle cost).
- Bedrock model usage: standard per-token pricing for Claude.
- Other components run locally at no additional cost.
Deploying the solution
- Clone the repository.
- Install Python dependencies.
- Create and deploy the agent to AgentCore.
Note the runtime Amazon Resource Name (ARN) from the output (or run
agentcore status). - Configure the bridge.Edit
bridge/bridge_config.jsonwith your runtime ARN:The bridge uses your local AWS credentials to generate presigned WebSocket URLs automatically, with no manual token management needed.
- Load the Chrome extension.
- Navigate to
chrome://extensions. - Turn on Developer mode.
- Choose Load unpacked, and then select the
extension/directory. - Note the extension ID displayed on the card.
- Navigate to
- Register the native messaging bridge.
This creates a launcher script and registers it with Chrome so the browser can spawn the bridge process.
Testing the solution
Restart the browser and choose the extension icon to open the side panel. The extension automatically requests a presigned URL from the bridge, connects to AgentCore, and discovers available MCP tools.
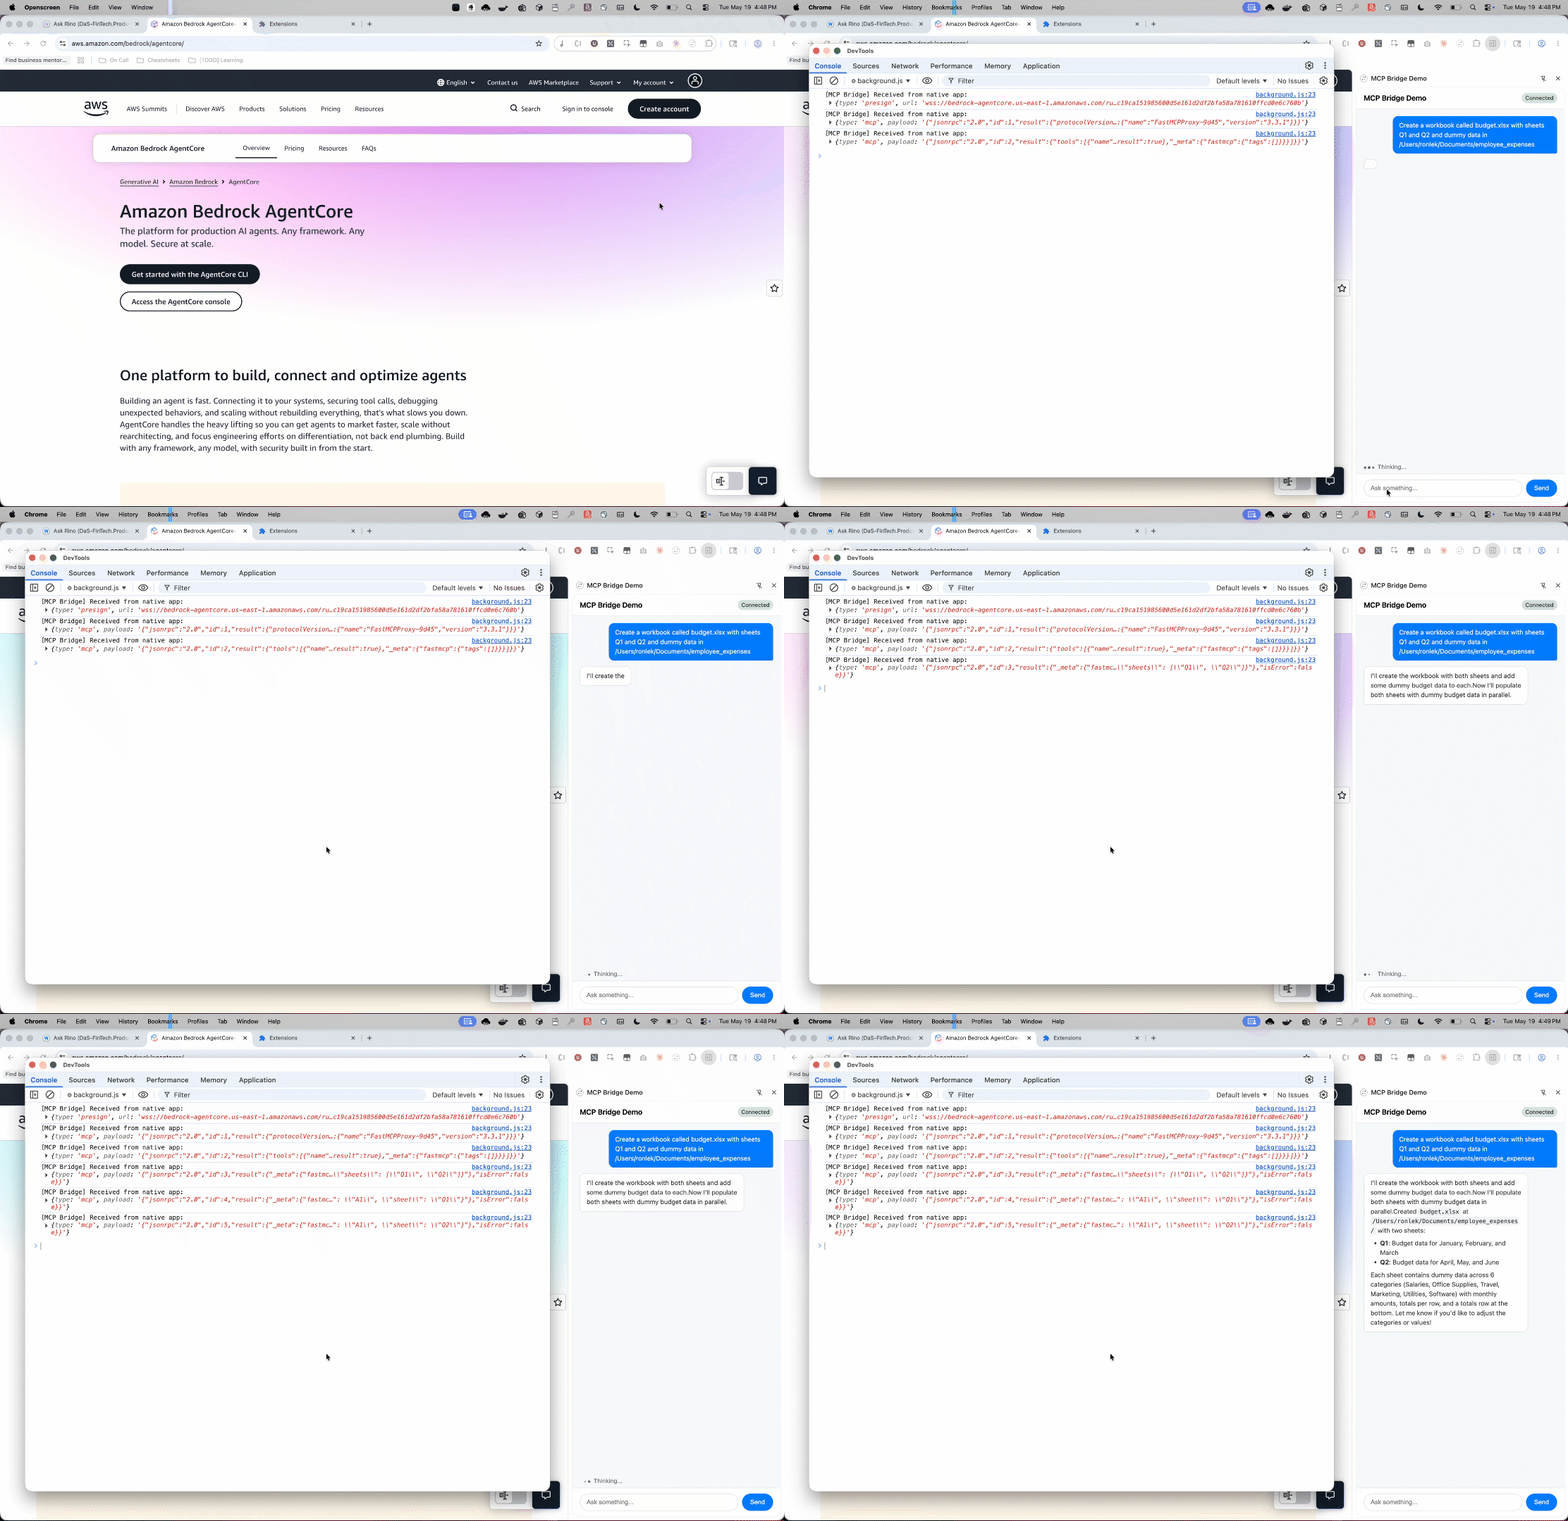
The browser extension connects to the MCP bridge over native messaging and relays MCP messages between the AgentCore-hosted agent and the side panel, as shown in the extension’s DevTools console
Additional queries to experiment with:
"Create a workbook called budget.xlsx with sheets Q1 and Q2"

"Write 'Revenue' in cell A1 of the Q1 sheet in budget.xlsx"

"Read the data from budget.xlsx"
Security considerations
This post prioritizes demonstrating the MCP bridge functionality and therefore limits security measures to the following:
- Native messaging origin restriction: Chrome checks the calling extension’s ID against the
allowed_originslist in the native messaging manifest and rejects connections from extensions not explicitly listed. - Presigned URL expiration: WebSocket URLs are SigV4-signed and expire after 5 minutes. Credentials remain on the user’s machine and are not sent to the browser.
- Process isolation: The extension, bridge, and MCP server each run in separate operating system processes with no shared memory.
The primary exposure surface unique to this architecture is the bridge itself. It accepts instructions from a cloud-hosted agent and runs them locally with the user’s file system permissions. The key principle is that the agent should not have more access than the user explicitly grants, and the user can always see what tools were invoked and with what arguments.
For a production system, in addition to implementing Amazon Bedrock Guardrails for content filtering, we recommend the following additional security measures:
| Layer | What to add | Why |
| Authentication | Require a JSON Web Token (JWT) handshake as the first WebSocket frame. Verify the token (for example, through Amazon Cognito and an HMAC secret in AWS Systems Manager) before accepting messages. | Helps prevent unauthorized use even if a presigned URL is leaked. |
| Payload signing | Sign every MCP message with Ed25519 (private key on the agent, public key on the bridge). Reject unsigned or tampered payloads. | Makes sure messages were not modified in transit between cloud and local machine. |
| File system scoping | Configure an explicit allowlist of directories the MCP server can access. Reject paths outside the boundary. | Helps prevent a prompt injection from tricking the agent into reading sensitive files (SSH keys, credentials). |
| Audit logging | Log every tool invocation (tool name, arguments, timestamp, result status) to a local file. | Provides traceability for what the agent did on the user’s machine. |
Clean up
When you’re done experimenting, remove the deployed resources to avoid ongoing charges.
- Remove the AgentCore deployment. Tear down the CloudFormation stack, IAM roles, and runtime resources.
- Unregister the native messaging bridge.
- Remove the Chrome extension.
- Navigate to
chrome://extensions. - Choose Remove on the MCP Bridge Demo card.
- Navigate to
- Delete local files (optional).
What’s next
Our internal production solution includes the capabilities that follow. The MCP Bridge acts as the AgentCore-hosted agent’s window into the user’s local system. Combined with the browser extension, the current architecture can be extended to support more use cases.
Browser actions
The browser extension can implement its own browser tools modeled on Playwright MCP’s tool definitions and expose them to the agent to perform actions such as clicking elements, filling forms, navigating pages, and taking screenshots.
Because the extension sits as a message relay between the AgentCore agent and the MCP Bridge, it can intercept tools/list and tools/call MCP messages, inject the browser tools into the tool list, and handle their execution locally.
Local tool automation
The bridge speaks standard MCP JSON-RPC over stdio, so MCP servers that use the stdio transport are compatible without modification. Add an entry to mcp.json. Examples: filesystem access for sandboxed file read/write, Git for repository operations, memory for persistent local knowledge graphs. See awesome-mcp-servers for a directory of available servers.
Packaging the bridge as a standalone binary
For production distribution, we use PyInstaller to package the bridge into a standalone binary that bundles the Python runtime, dependencies, and configuration into a single executable. The native messaging manifest points directly at this binary, so users do not need to install Python or manage virtual environments. The bridge works on first extension launch with no extra setup.
Conclusion
In this post, we built an MCP bridge that connects a cloud-hosted Strands agent on Amazon Bedrock AgentCore to local MCP tool servers running on a user’s machine. Using a browser extension as the relay layer and Chrome’s native messaging as the local transport, we tunneled standard MCP JSON-RPC messages between the cloud and the user’s file system without exposing credentials to the browser or modifying the MCP protocol itself.
With this pattern, you can keep your agent centrally deployed and managed while giving it access to tools that must run locally, such as Excel files, Git repositories, or other locally running MCP servers. The architecture is extensible. You can add new tools with a one-line config change, layer in browser actions through the extension, or package the bridge as a standalone binary for frictionless distribution.
To get started, deploy the sample repository and experiment with your own MCP servers. For more on the services used in this post, explore the Amazon Bedrock AgentCore documentation, the Strands Agents SDK, and the Model Context Protocol specification.
Thanks to Daniel Sheng Sun, Markus Hueck, Nishant Bisen, Shraddha Kabade, and Stacy Kim for their contributions to the internal production system that inspired this post.