At Google Cloud, we often see customers asking themselves: “How can we manage our generative AI costs effectively without sacrificing the performance and availability our applications demand?”
This is the million-dollar question — or, perhaps more accurately, the “tokens-per-minute” question. The key isn’t just about choosing the cheapest option, but about finding the right recipe of tools and services that aligns with your workload patterns.
This guide will walk you through Google Cloud’s flexible gen AI infrastructure options, showing you how to find that sweet spot on the efficient frontier between cost and performance. We’ll start with the foundational pay-as-you-go (PayGo) models and then explore how to layer on more specialized options to build a robust and cost-effective gen AI strategy.
Understanding your foundation: Pay-as-You-Go (PayGo) options
For many workloads, Google Cloud’s standard PayGo offerings provide a powerful and flexible starting point. To get the most out of them, it’s crucial to understand the mechanisms that govern performance and availability.
1. Dynamic Shared Quota (DSQ)
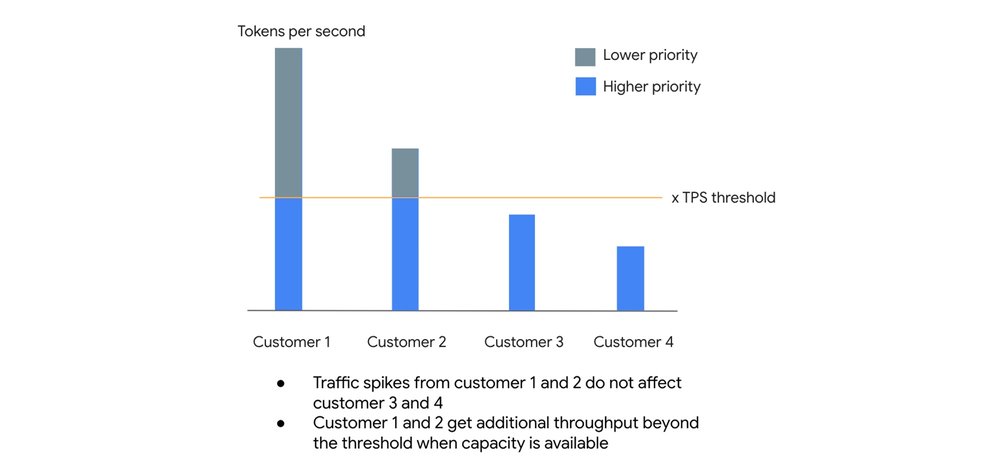
At its core, the standard PayGo environment operates on a principle of fairness and efficiency called Dynamic Shared Quota (DSQ). Instead of enforcing rigid, per-customer limits, DSQ intelligently distributes available GenAI capacity among all customers.

How it works:
- High-priority lane: Your organization has a default Tokens Per Second (TPS) threshold. Any requests you send that fall within this threshold are given higher priority. This lane is designed to provide high availability, targeting a 99.5% SLO.
- Best-effort lane: If you experience a spike in traffic and exceed your TPS threshold, your excess requests are not immediately dropped. Instead, they are handled with lower priority, receiving throughput when there is spare capacity available.
This system is designed so that sudden traffic spikes from one customer do not negatively impact the baseline performance of others. You get a reliable level of service for your everyday needs, with the potential to burst when the system has capacity to spare.
2. Usage tiers: Rewarding your investment
To provide more predictable performance as your gen AI usage grows, Google Cloud automatically places your organization into Usage Tiers based on your rolling 30-day spend on eligible Vertex AI services. The higher your tier, the higher your guaranteed Tokens Per Minute (TPM) limit.
At the time of this article, these are the tiers for our popular model families:
|
Model Family |
Tier |
Spend (30 days) |
TPM |
|
Pro Models |
Tier 1 |
$10 – $250 |
500,000 |
|
Tier 2 |
$250 – $2,000 |
1,000,000 |
|
|
Tier 3 |
> $2,000 |
2,000,000 |
|
|
Flash / Flash-Lite Models |
Tier 1 |
$10 – $250 |
2,000,000 |
|
Tier 2 |
$250 – $2,000 |
4,000,000 |
|
|
Tier 3 |
> $2,000 |
10,000,000 |
Important: For the most updated model and threshold please always refer to the documentation
Crucially, you should think of your tier limit as a floor, not a ceiling.

-
Critical traffic: Traffic up to your organization’s tier limit is protected. You should experience minimal to no 429 (resource exhausted) errors as long as you stay within this baseline.
-
Opportunistic bursting: When you exceed your tier limit, you can still burst to use spare system capacity on a best-effort basis. If the entire system is under heavy load, fair-share throttling will engage for this excess traffic. The key takeaway is that we don’t artificially cap your performance if there’s idle capacity available.
3. Priority PayGo: Your insurance policy for spikes
What if your workload is prone to unpredictable spikes and you can’t risk 429 errors, but you’re not ready to commit to a fixed capacity model? This is where Priority PayGo comes in. It’s designed to give you the best of both worlds: the flexibility of PayGo with the high availability needed for important traffic.
For a premium, you can tag specific API requests for higher priority.
Important: Please note that the Priority PayGo feature is currently available only for the global endpoint. Future release on regional endpoints might happen but is not guaranteed.
How to use Priority PayGo:It’s as simple as adding a header to your API call. No sign-up or commitment is needed.
- code_block
- <ListValue: [StructValue([(‘code’, ‘curl -X POST \rn -H “Authorization: Bearer $(gcloud auth print-access-token)” \rn -H “Content-Type: application/json” \rn -H “X-Vertex-AI-LLM-Shared-Request-Type: priority” \rn https://aiplatform.googleapis.com/…’), (‘language’, ”), (‘caption’, <wagtail.rich_text.RichText object at 0x7f4862117f10>)])]>
Be mindful of the ramp limit. As the images below illustrate, ramping up priority requests too quickly can cause some requests to be downgraded to standard priority if capacity is constrained. A slower, more gradual ramp-up ensures the best experience and mitigates downgrading.
For example:
System tries to serve priority requests even when they are above the ramp limit, however they are subject to downgrading (not throttling) when capacity is constrained
Ramping priority requests within the limit mitigates downgrading and ensures good experience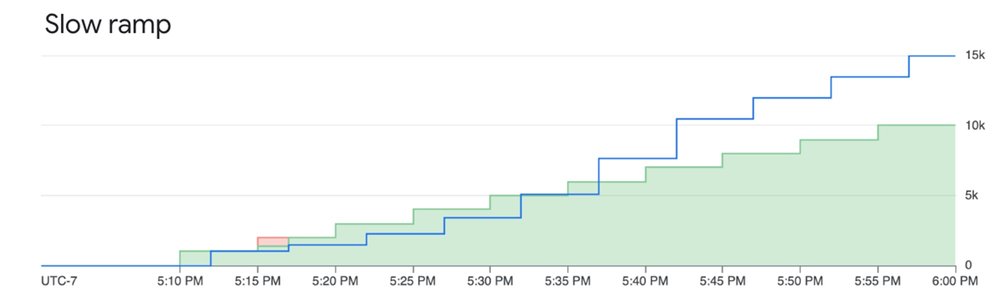
You can monitor your utilized Priority PayGo request following this documentation
For the uncompromising workload: Provisioned Throughput (PT)
When your gen AI workload is absolutely business-critical and you need an explicit availability guarantee, it’s time to consider PT.
With PT, you reserve a specific amount of model processing capacity for a fixed monthly cost. This is the only way to get an availability SLA. While a standard PayGo model has an uptime SLA (the model is up), PT provides an availability SLA (your requests will be processed).
Let’s deep dive a little bit in more detail by the definition of “error rate”: the number of Valid Requests that result in a response with HTTP Status 5XX and Code “Internal Error” divided by the total number of Valid Requests during that period, subject to a minimum of 2000 Valid Requests in the measurement period.
While standard PAYG returns 429 in case of “Resource exhausted” resulting on the call not being count in the error rate , for standard Provisioned Throughput, when you use less than your purchased amount, errors that might otherwise be 429 are returned as 5XX and count toward the SLA error rate. This is what defines the SLA difference between PT and PAYG.
This makes Provisioned Throughput the ideal choice for:
-
Large, predictable production workloads.
-
Applications with strict performance requirements where throttling is not an option.
Fine-grained control over your PT requests
By default, any usage above your PT order automatically spills over to PAYG. However, you can control this behavior at the request level using HTTP headers:
Prevent overages: To ensure you never exceed your PT commitment and deny any excess requests, add the dedicated header. This is useful for strict budget control.
- code_block
- <ListValue: [StructValue([(‘code’, ‘{“X-Vertex-AI-LLM-Request-Type”: “dedicated”}’), (‘language’, ”), (‘caption’, <wagtail.rich_text.RichText object at 0x7f4862117d90>)])]>
Bypass PT on-demand: To intentionally send a lower-priority request to the PayGo pool even though you have a PT order, use the shared header. This is perfect for experimenting or running non-critical jobs without consuming your reserved capacity.
- code_block
- <ListValue: [StructValue([(‘code’, ‘{“X-Vertex-AI-LLM-Request-Type”: “shared”}’), (‘language’, ”), (‘caption’, <wagtail.rich_text.RichText object at 0x7f4850644d90>)])]>
Monitoring your investment
You can closely monitor your Provisioned Throughput usage using Cloud Monitoring metrics on the aiplatform.googleapis.com/PublisherModel resource. Key metrics include:
- /dedicated_gsu_limit: Your dedicated limit in Generative Scale Units (GSUs).
- /consumed_token_throughput: Your actual throughput usage, accounting for the model’s burndown rate.
- /dedicated_token_limit: Your dedicated limit measured in tokens per second.
This allows you to ensure you are getting the value you paid for and helps you right-size your commitment over time. To learn more about PT on Vertex AI, visit our guide here.
Building your recipe: Combining options for optimal results
Consider a workload with a predictable daily baseline, expected peaks, and the occasional unexpected spike. The optimal recipe would be:
-
Provisioned Throughput: Cover your predictable, mission-critical baseload. This gives you an availability SLA for the core of your application.
-
Priority PayGo: Use this to handle predictable peaks that rise above your PT commitment or for important traffic that is less frequent. This acts as a cost-effective insurance policy against 429 errors for your most important variable traffic.
-
Standard PayGo (within tier limit): This forms your foundation for general, non-critical traffic that fits comfortably within your organization’s usage tier.
-
Standard PayGo (opportunistic bursting): For non-critical, latency-insensitive jobs (like batch processing), you can rely on the best-effort bursting of the standard PayGo model. If some of these requests are throttled, it won’t impact your core user experience, and you don’t pay a premium for them.
By understanding and combining these powerful tools, you can move beyond simply managing costs and start truly optimizing your GenAI strategy for the perfect balance of performance, availability, and value.
Extra bonus: Batch API and Flex PayGo
Starting with the Batch API, not every LLM request needs a sub-second time-to-first-token (TTFT). If a user is chatting with a customer service bot, low latency is critical. But if you are classifying millions of support tickets from last month, running evaluations, or generating daily summary reports, nobody is sitting at a screen waiting for a real-time stream. This is where the Gemini Batch API becomes your best friend. Customers can bundle up a massive payload of requests into a single file and submit it asynchronously. The infrastructure processes these workloads during off-peak windows or when idle compute capacity is available. The target turnaround time is 24 hours, though in practice, it is typically much faster. By trading immediate execution for asynchronous processing, you get a 50% discount on standard token costs.
While Batch handles your offline heavy lifting, your live apps still need real-time computation. But not all requests are latency-driven and customers might accept to wait a little longer to get a discount on the standard token costs. Flex PayGo provides a highly cost-effective way to access Gemini models, offering a 50% discount compared to Standard PayGo. Optimized for non-critical workloads that can accommodate response times of up to 30 minutes, it allows for seamless transitions between Provisioned Throughput (PT), Standard PayGo, and Flex PayGo with minimal code changes. Ideal use cases include:
-
Offline analysis of text and multimodal files.
-
Model quality evaluation and benchmarking.
-
Data annotation and labeling.
-
Automated product catalog generation.
Get started
-
Explore the Models in Vertex AI: Discover the full range of Google’s first-party models as well as over 100 open-source models available in the Model Garden
-
Dive deeper into the documentation: For the most up-to-date technical details, thresholds, and code samples, the official Vertex AI documentation is your source of truth.
-
Review pricing details: Get a detailed breakdown of token costs, Provisioned Throughput pricing, and the latest discounts for Batch and Flex APIs on the Vertex AI pricing page.